Wiring and Placing Under-Cabinet Lighting
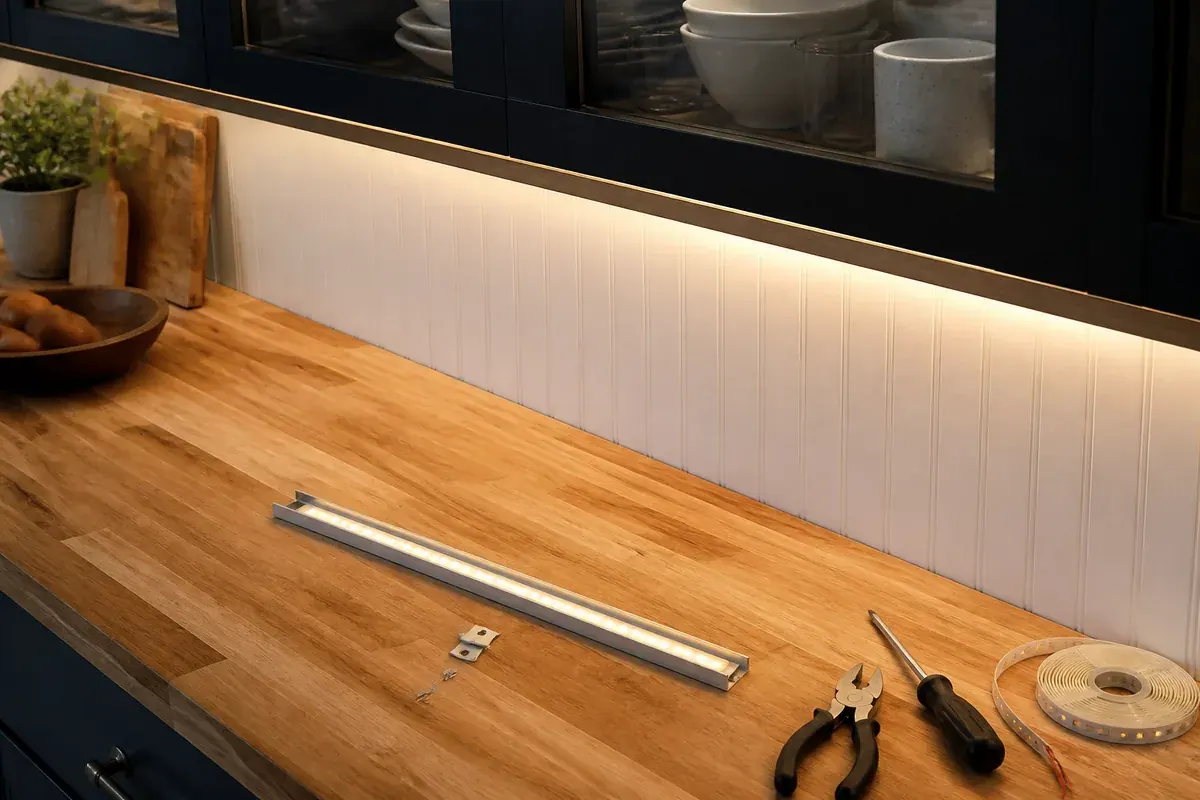
Walk into a kitchen where the under-cabinet lighting went wrong and the giveaway is optical, not aesthetic. A hot band of light burns across the backsplash tile, and the front six inches of counter, where the cutting board actually sits, stays dim. The cause is position. The emitter was fastened to the back wall of the cabinet recess, so its strongest output travels down the tile instead of out across the work surface, and the front lip of the counter drops into the shadow thrown by the cabinet’s own bottom edge.
Turn toward the seating side and the second failure appears. An uncovered diode strip sits in your sight line and repeats itself as a row of bright points in the counter, in the backsplash, and in the glass of any upper cabinet door facing it. Neither problem is a product defect. Both are fixed by moving the source forward and putting a lens in front of it.
Where the Strip Sits Inside the Cabinet
In most kitchens the wall cabinets run around 12 inches deep and hang roughly 18 inches above a counter that is about 25 inches deep. That geometry decides everything. A source pushed to the back of the recess has 12 inches of cabinet bottom between it and the front of the counter, and the cabinet bottom is opaque, so the far third of the work surface receives only bounced light.
Move the same source to within 1 to 2 inches of the front face and the shadow inverts. Now the cabinet bottom is behind the light rather than in front of it, and output spreads across the full counter depth with the brightest zone landing where your hands are. The reason cabinets have a face frame, a light rail, or a small applied valance is that this front position needs a physical block between the emitter and your eye.
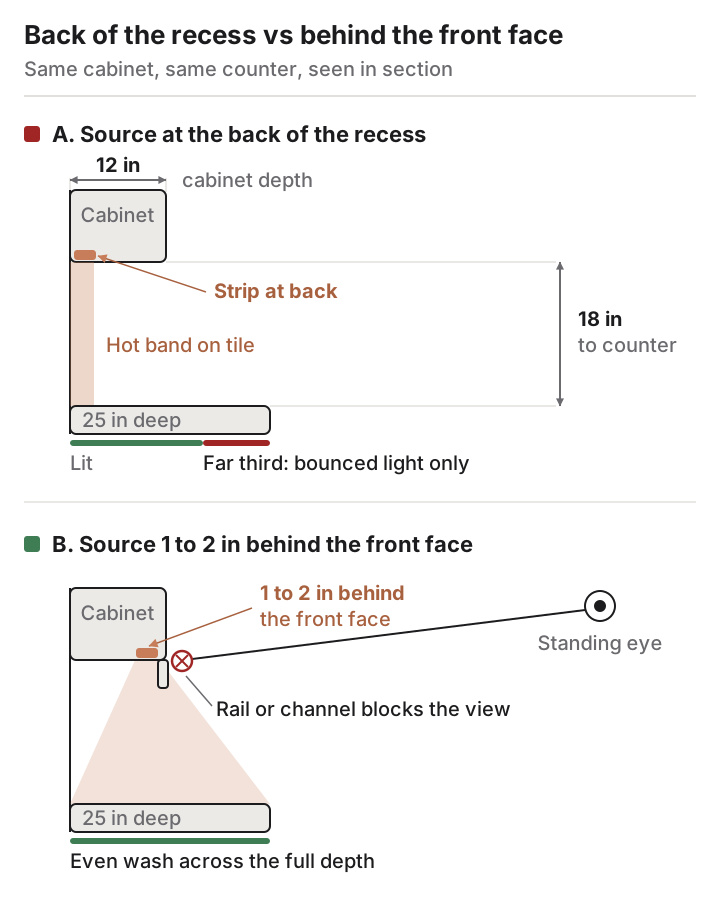
If your cabinets have no front rail, the channel itself becomes the block. A deep aluminum extrusion set flush with the cabinet’s front edge shields the diodes from anyone standing at normal height while still throwing light forward and down.
Tape, Pucks, and Bars Produce Different Shadows
The three common formats are not interchangeable, and the difference shows up in the shadow each one casts on a counter rather than in a showroom.
| Format | What the output does | Shadow signature | Where it fits |
|---|---|---|---|
| LED tape in an aluminum channel | Continuous line of light along the whole run | Almost none, a soft even wash with no gaps | Main prep runs, and any kitchen with a glossy backsplash that would reveal the source |
| Puck lights | Discrete pools from point sources | Scalloped bright ovals with dim wedges between them | Glass-front display cabinets, a single short cabinet, accent work |
| Sealed light bars | Fixed-length modules with a built-in diffuser | Even within each bar, then a hard dark cut at both ends | Retrofits and rentals where cutting a channel to length is not practical |
Pucks get chosen more often than they should. Their scallop pattern is the signature of point sources spaced too far apart, and closing that spacing usually means buying more fixtures than a run of tape would have cost. Bars land in between. They solve the diffuser problem in the box, but the dark gap where one bar ends and the next begins is set by the housing length and cannot be closed.
Aluminum Channel and the Diffuser Lens
Bare tape stuck to raw wood is the most common shortcut, and it costs you twice. The diodes stay visible as discrete points, and the adhesive backing sits against a material that conducts heat poorly.
An extruded aluminum channel fixes both. The metal acts as a heat path away from the tape, and the snap-in lens spreads output so the run reads as a line rather than a string of dots. Armacost Lighting sells aluminum tape light mounting channels in surface, wide surface, deep surface, recessed, drywall-recess, bendable, and corner profiles, in silver, black, and white, sold in packs of five from about $30. The corner profile holds the tape at an angle, aiming output forward into the room instead of straight down.
Frosted lenses hide diodes better than clear ones and cost a little output in exchange. Read the delivered-lumen figure with the lens fitted, not the bare tape figure, whenever both are published.
Color Temperature and CRI Over a Cutting Board
Under-cabinet light lands on food, and food is where poor color rendering shows first. Raw chicken, browned onions, and the difference between a ripe and an underripe tomato all sit in a part of the spectrum that cheap phosphor blends handle badly. The common specification for a food prep surface is a color rendering index of 90 or better, and that figure is worth protecting ahead of raw brightness.
Color temperature is a separate decision. Warmer sources around 2700K flatter wood and warm stone; 3000K stays warm while reading cleaner against white quartz; 4000K reads accurate but can look clinical beside warm cabinetry. Matching the ceiling fixtures already in the room counts for more than the exact number, because two temperatures in one field of view read as a fault.
The line name on the box does not settle CRI. Armacost’s own product page for the RibbonFlex Pro 24V White COB tape lists CRI 90 across 2700K, 3000K, 4000K, and 5000K, with output tiers of 165, 315, and 442 lumens per foot on an 8mm-wide strip. A SuperBrightLEDs listing for a RibbonFlex Pro 24V IP20 5m reel publishes CRI 80+ with 428 lumens per foot at 3000K and 3.9 watts per foot at $94.99. Same family name, different specification, so check the SKU.
Lumens per Foot, Worked for a Real Counter
Buy by linear foot of output, not by total lumens on a box. Here is the arithmetic for a common kitchen with an 8-foot run of wall cabinets and a separate 4-foot run.
- Total the cabinet lengths: 96 inches plus 48 inches equals 144 inches.
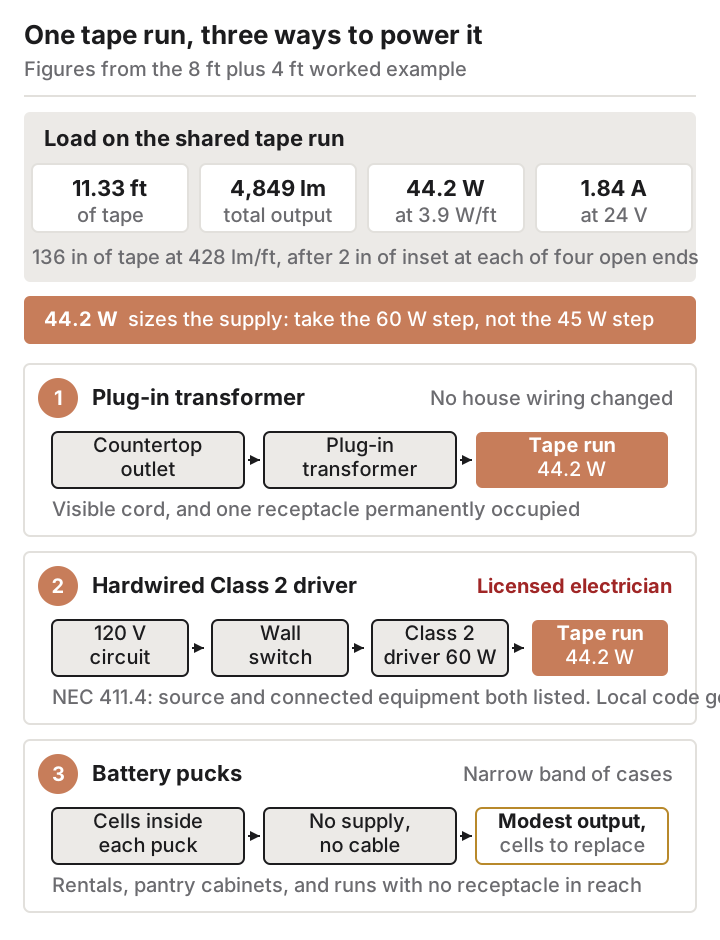
- Subtract 2 inches of inset at each open end, four ends in total, so 144 minus 8 equals 136 inches, or 11.33 feet of tape.
- Multiply by output: 11.33 feet at 428 lumens per foot gives 4,849 lumens across the two runs.
- Multiply by draw: 11.33 feet at 3.9 watts per foot gives 44.2 watts.
- Convert to current: 44.2 watts divided by 24 volts equals 1.84 amps.
That 44.2-watt figure is the number that sizes your power supply. It sits just under the common 45-watt driver step, which leaves almost no headroom, so the 60-watt step is the sounder specification and leaves the supply running well below its rating. Run the same arithmetic on your own cabinet lengths before ordering, because a driver chosen to match the load exactly is the one that runs hot and fails early.
Plug-In Transformer, Hardwired Driver, or Battery
A plug-in transformer is the least invasive option. The supply plugs into an existing countertop receptacle, the cord runs up behind the cabinet, and nothing about the house wiring changes. The trade is a visible cord and a receptacle permanently occupied.
Hardwiring the driver is the finished answer, and it is also the point where this stops being a homeowner job. The low-voltage supply is fed from a 120-volt circuit, mounted inside a cabinet or above a soffit, and switched at the wall alongside the other kitchen controls. Landing that 120-volt feed, setting a switch box, or lengthening a branch circuit to reach it all fall to a licensed electrician. Around the country that work is rarely legal without a permit on file and an inspector’s sign-off at the end. NEC 411.4 requires that both the Class 2 power source and the lighting equipment connected to it be listed, a requirement the 2014 revision extended to cover the connected equipment and not only the supply. Your local jurisdiction adopts and amends the code on its own schedule, so treat that as the national baseline and let the authority having jurisdiction settle the rest.
Battery pucks belong in a narrow band of cases. They suit a rental where nothing may be drilled into a wall, a pantry cabinet used briefly, or a run where no receptacle exists within reach. Output is modest, and the cells become a recurring chore.
Dimmers That Match a Low-Voltage Driver
Dimming under-cabinet tape is a two-part problem, because the wall control and the driver have to speak the same protocol. Armacost’s dimmable driver range shows the split clearly: a Universal Dimmable 24V DC LED Driver in TRIAC form covers 15, 24, 45, 60, and 120 watts from about $40, while the Universal+ 24V DC driver, SKU 870240, accepts forward-phase, reverse-phase, ELV, MLV, and TRIAC input across 30, 45, 60, 150, and 300 watts from about $70.
Buy the driver and the wall control as a pair, and check the control’s stated compatibility before you close the wall. Lutron’s Diva range includes an LED+ Pro Max model and an ELV+ dimmer the company describes as tailored to electronic low-voltage applications such as tape light. A driver rated well above its actual load, dimmed by a control it was designed for, is the combination that behaves at the bottom of the range.
Switch Location and Cable Routing
Put the control where a hand reaches when entering the kitchen, ganged with the existing wall switches rather than tucked inside a cabinet. An inline switch on a plug-in cord is acceptable only when there is genuinely no alternative, because it trains everyone to leave the light on.
Cable wants to move through the cabinet carcass, not around it. Drill 3/8-inch pass-throughs high in each gable, away from the back of drawer boxes and the swing of hinges, then run the low-voltage cable through and secure it so it cannot sag into view. Keep low-voltage cable out of any box containing 120-volt conductors unless the box and the fitting are rated for it.
Installing Tape and Channel, Step by Step
- Mark the tape line 1 to 2 inches behind the front face of every cabinet in the run.
- Measure each cabinet, subtract 2 inches at each open end, and total the linear feet.
- Multiply by the published watts per foot, then choose the next driver step above that figure with room to spare.
- Choose the power option now, before anything is drilled, because plug-in and hardwired routes take different paths.
- Cut the channel to length, dry-fit it, and stand where a guest would stand to confirm the lens hides the diodes.
- Drill the gable pass-throughs and pull the low-voltage cable.
- Stop here if the job needs new 120-volt wiring, a new switch box, a driver connected to house circuits, or any penetration through a stud bay or fire block. Call a licensed electrician at that point; a hole cut through a fire block in particular has to be resealed to the rating it started with, and an inspector checks exactly that.
- Mount the channel, apply the tape, and make the low-voltage connections at one end of each run.
- Power up and test at full output before any cover plate or lens goes back on.
- Fit the lens, set the dimmer, and check the low end for stability.
When Existing Under-Cabinet Light Looks Wrong, Change Its Position First
Most people reach for brightness when the light disappoints, and buy a brighter tape that lands in the same wrong place. Position is the specification to fix first. Move the source to within 1 to 2 inches of the cabinet’s front edge, put it in a channel with a frosted lens, and a large share of the complaints about glare, backsplash hot spots, and a dark counter edge resolve without a single extra lumen. Only after the source sits in the right place, hidden and diffused, is it worth arguing about color temperature, CRI, or output per foot.