Your New LED Bulbs Flicker on the Old Dimmer
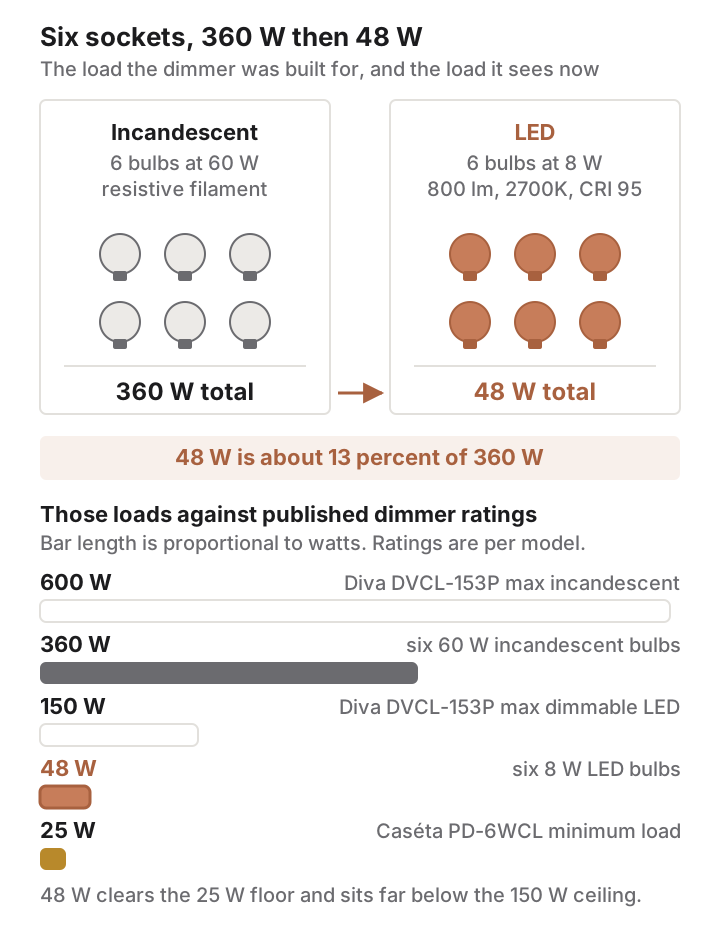
A dimmer built for incandescent lamps was engineered around one kind of load: a tungsten filament, which behaves like a resistor. Chop up the sine wave feeding it and it draws current in proportion to whatever voltage survives, with no opinion about the waveform’s shape. Six 60-watt bulbs in a chandelier handed that dimmer 360 watts of steady, predictable resistive load, and more than enough current passing through the switch to keep the dimmer’s own internal electronics running.
Put LEDs in the same six sockets and the arithmetic collapses. A Philips Ultra Definition A19 sold as a 60-watt replacement is published at 8 watts, 800 lumens at 2700K, and a color rendering index of 95. Six of those total 48 watts.
The dimmer is now seeing about 13 percent of the load it was designed around. Worse, what it sees is not a resistor at all. It is six small switching power supplies, each drawing current in short ragged gulps instead of smoothly, and Digi-Key’s technical article on phase-cut control states the core problem in one line: LEDs are not a pure resistive load.
Everything else follows from that mismatch. The hum in the wall plate, the strobe near the bottom of the slider travel, the bulb that quits before the slider reaches its stop, the faint glow that will not go out after you push the switch off: these are not defective bulbs so much as a control and a load that were never introduced to each other.
The Load Math Behind a 360-Watt Circuit Now Drawing 48
Dimmer specifications carry two numbers, and most people only read one. The maximum is the familiar one. A Lutron Diva LED+ DVCL-153P is rated for 150 W of dimmable LED or 600 W of incandescent and halogen, and it needs no neutral wire.
The minimum is the number that decides how your fixture behaves. Lutron publishes it per model, and the spread is instructive: the Caséta PD-6WCL and the PD-10NXD both list a minimum load of 25 W incandescent, or one bulb for LED, while the PD-5NE lists 10 W. Note the phrasing on the LED side. The manufacturer stops quoting watts and starts counting bulbs, because wattage stopped being a useful proxy for the current an LED driver draws.
A dimmer that cannot keep enough current flowing through itself misbehaves in a specific, recognizable way: it loses its grip partway through each half cycle and has to re-establish it, over and over, 120 times a second. That is the shimmer you see. It is also why a single 8-watt LED on a large old dimmer often performs worse than four of them on the same device.
Leading Edge, Trailing Edge, and Where the Cut Happens
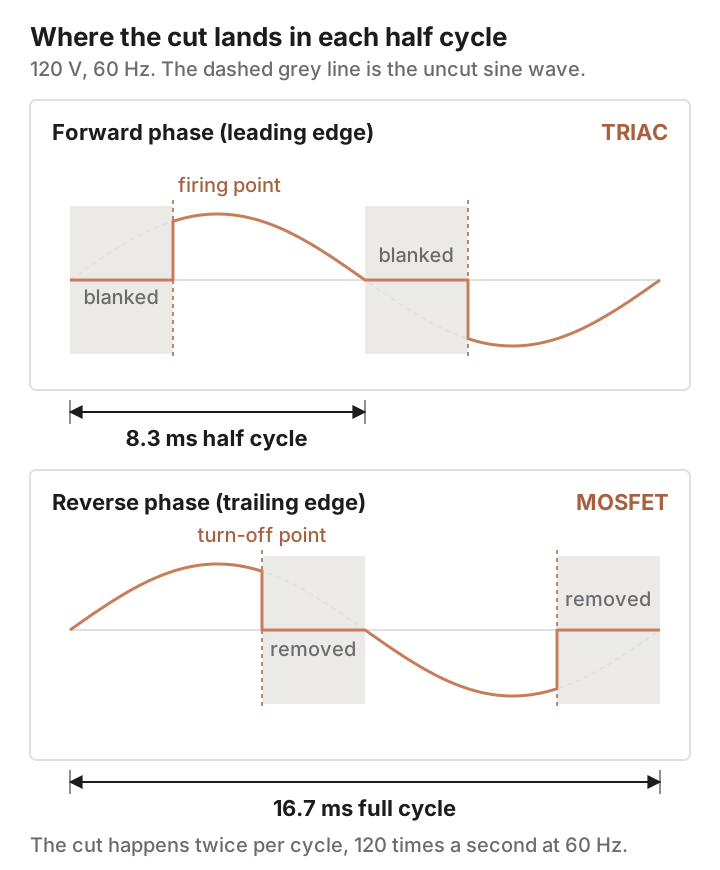
Phase-cut dimming works by removing part of every half cycle of the incoming 120 V, 60 Hz waveform. At 60 Hz a full cycle lasts about 16.7 milliseconds, so each half cycle runs roughly 8.3, and the cut happens twice per cycle. Where in that 8.3 milliseconds the cut lands is the entire distinction between the two dimming families.
Forward phase, also called leading edge, blanks the beginning of each half cycle and then snaps on. The switching device is a TRIAC, which is cheap, robust, and the reason nearly every dimmer sold before the LED era works this way. Reverse phase, or trailing edge, does the opposite: it conducts from the zero crossing and switches off partway through, using a MOSFET instead. The reverse-phase turn-off is gentler, which is why it tends to suit electronic drivers and low-voltage transformers better.
Which one you own is usually not printed on the paddle. It is in the spec sheet:
| Lutron model | Neutral wire | Max LED | Max incandescent | Minimum load | Phase control |
|---|---|---|---|---|---|
| Caséta PD-6WCL | Not required | 150 W | 600 W | 25 W incandescent, 1 bulb LED | Forward phase only |
| Caséta PD-10NXD | Optional, recommended | 250 W | 1000 W | 25 W incandescent, 1 bulb LED | Forward phase only |
| Caséta PD-5NE | Required | 250 W | 500 W | 10 W incandescent, 1 bulb LED | Forward or reverse, reverse is the ELV default |
That minimum-load column is the one worth reading first when a fixture is small. A two-socket sconce running LEDs is the classic candidate for trouble, and no bulb swap fixes a dimmer that structurally cannot run that light.
What the Word “Dimmable” on the Box Covers
An LED lamp is not one component. The industry standard that governs phase-cut behavior, NEMA SSL 7A-2015, defines its compatibility requirements around an LED light engine, meaning “one or more LED modules, LED control gear (integral or remote), and a connection to the mains circuit”, combined with a forward phase-cut dimmer. Compatibility is a property of the pairing, not of either half alone.
A non-dimmable bulb makes this vivid. Its driver assumes an uninterrupted sine wave and has no circuitry for interpreting a chopped one, so on a dimmer it will flicker, stutter, or refuse to start, and the driver runs stressed the whole time. Check the base and the box. Many manufacturers print “dimmable” directly on the lamp collar.
Dimmable is a floor, not a guarantee. Lutron is unusually blunt about this in its own LED compatibility FAQ, stating that it can only recommend dimmable CFL and LED bulbs that it has tested (per UL) and deemed compatible with its dimmers, which is why the company publishes a searchable compatibility tool organized by dimmer model. Other control manufacturers publish similar lists.
Mixing Bulb Brands on One Circuit
Two dimmable LEDs from different manufacturers can each work beautifully alone and fight each other on the same dimmer. Their drivers have different startup thresholds, different inrush behavior, and different responses to a truncated waveform, so the dimmer ends up trying to satisfy two dimming curves at once. The usual result is one bulb lighting while the other stays dark at low settings, or a visible brightness mismatch across a fixture.
Standardize the fixture. Same brand, same model number, same color temperature, same wattage, all sockets. That eliminates an entire category of symptom in one move.
The Neutral Wire Question in Smart Dimmers
Older switch boxes frequently contain only a hot conductor and a switch leg. A dimmer with no neutral has to power itself by leaking a trickle of current through the load, which is precisely the current an efficient LED refuses to swallow gracefully. That is the mechanism behind ghosting, where the LED will never fully turn off, the faint glow that outlasts the switch.
Manufacturers acknowledge the tradeoff openly. Lutron notes that on the PD-10NXD the neutral is optional but recommended, and that connecting the neutral wire can resolve issues associated with minimum load requirements. There is also a purpose-built part for the no-neutral case, the Lutron LUT-MLC minimum load capacitor, which wires onto the circuit to add a small artificial load. Lutron describes it as provided to help ensure proper operation with LED, fluorescent and ELV loads, especially at lower wattages.
Do not treat that capacitor as a cure-all. It addresses the minimum-load family of faults specifically. Buzzing, a bad dimming curve, or an incompatible driver will still be there afterward.
Flicker That Persists at Every Setting
There is a separate failure that has nothing to do with your dimmer. Some inexpensive LED drivers do a poor job of smoothing rectified AC, so the light output ripples at twice the line frequency, 120 Hz, whether the bulb is dimmed or running flat out. Digi-Key’s flicker primer states the general case: the frequency of the flickering is typically either equal to the mains frequency (usually 50 or 60 Hz) or double the mains frequency. You may perceive it as eye strain, a stroboscopic stutter on a moving hand, or banding on a phone camera pointed at the fixture.
This is a documented concern rather than folklore. IEEE 1789-2015, IEEE Recommended Practices for Modulating Current in High-Brightness LEDs for Mitigating Health Risks to Viewers, recommends modulation frequencies for LED lighting and dimming intended to protect against known potential adverse health effects. It was approved in March 2015 and is now listed as inactive-reserved.
The practical test is simple. Wire the suspect bulbs into a fixture on an ordinary toggle switch with no dimmer anywhere in the circuit. If the ripple is still visible at full output, the driver is the problem, and no dimmer on the market will fix it.
A Nine-Step Sequence for Isolating the Fault
Work in this order. It runs from free to expensive, and each step removes a whole class of cause.
- Read every bulb on the circuit. Confirm “dimmable” appears on the collar or the packaging, and set aside anything that does not say so.
- Test the same bulbs on a plain toggle switch elsewhere in the house. Flicker at full output with no dimmer involved points at the driver, and you can stop here.
- Kill the breaker, verify the box is dead with a non-contact tester, and read the dimmer’s model number off the yoke or the back of the device.
- Look up that model’s minimum load and maximum LED rating. Compare it against your actual fixture: bulb wattage multiplied by socket count.
- Reduce the fixture to one bulb, restore power, and run the full range. Then add bulbs back one at a time, testing after each.
- Replace the whole fixture with one brand and one model number. No mixing, including no mixing of color temperatures.
- Run the bulbs through the dimmer manufacturer’s compatibility tool. If they are not listed, borrow or buy one lamp that is and test it alone.
- Adjust the low-end trim if your dimmer has one. Lutron’s troubleshooting guidance for lights flickering at low levels is to adjust the low-end range of the dimmer until the lights stop flickering, which trims off the part of the dimming curve where some LEDs perform poorly.
- Swap the dimmer for a current LED-rated model whose minimum load sits below your fixture’s real draw, matching phase type to the load.
Steps 1 through 8 involve nothing more dangerous than a breaker and a screwdriver. Step 9 is different in kind: replacing a line-voltage device is regulated electrical work in many places, so hand it to a licensed electrician unless your own jurisdiction plainly permits a homeowner to change out a switch.
Where the Diagnostic Ends and an Electrician Begins
Stop and hire a licensed electrician when the box has no neutral and your chosen dimmer requires one, when the fixture runs through a magnetic or electronic low-voltage transformer, when the circuit is a three-way or four-way arrangement you cannot trace, when you find aluminum branch-circuit conductors, or when the box lacks an equipment ground. Stop immediately, at any point, if you see scorching, smell hot plastic, or hear crackling rather than the steady hum of phase-cut dimming. Which of those a homeowner may legally touch, and whether a permit rides along with it, is answered differently one municipality to the next, so ask yours before opening a wall.
Run the order and the fault usually names itself. Non-dimmable bulbs and a bad driver fall out in the first two steps, load and quantity problems in steps 4 and 5, brand conflicts in step 6, curve problems in steps 7 and 8.
What remains after all of that is a control mismatched to its load. At that point you are not fixing a bulb. You are replacing a device specified for tungsten and asked to run electronics, which is a different job with a different budget and, for some circuits, a different pair of hands.