Renter Upgrades That Come Back Off Without Damage
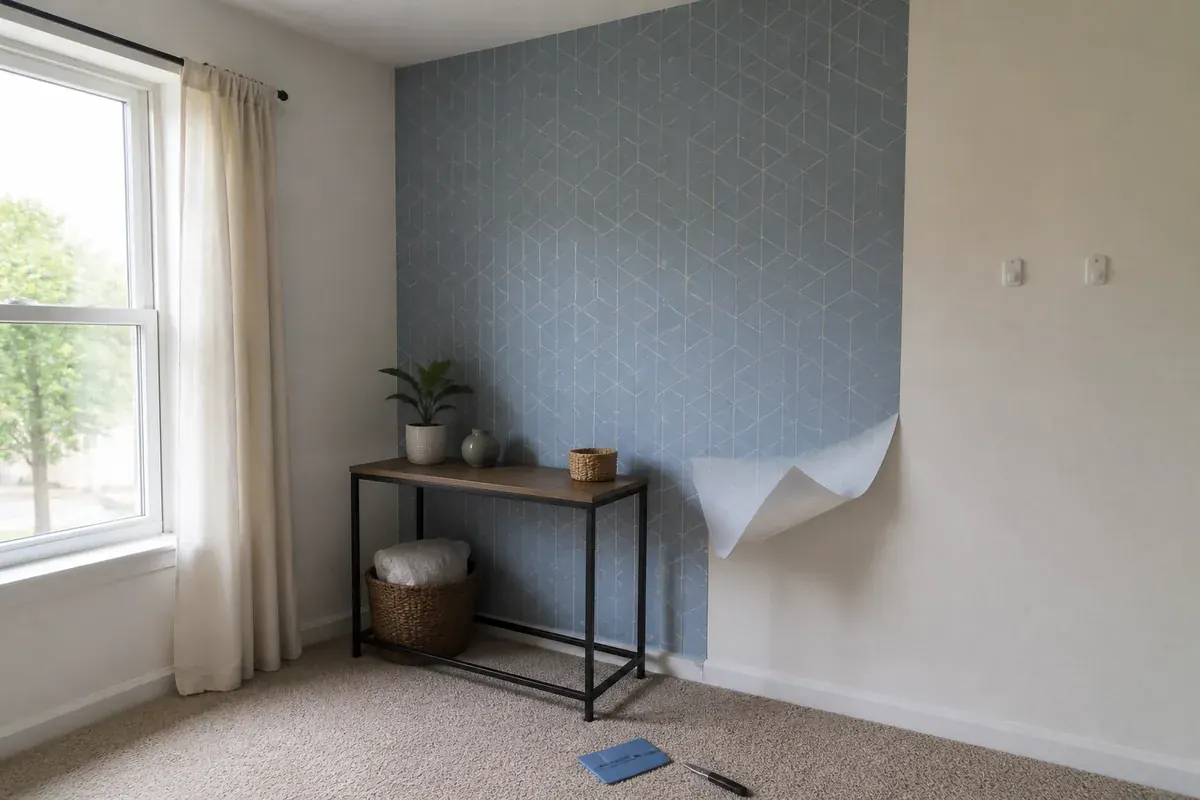
A security deposit is not a decorating budget, but it writes one. California’s security deposit statute permits a landlord to claim for “the repair of damages to the premises, exclusive of ordinary wear and tear, caused by the tenant” (Civil Code 1950.5). Many states draw the line in similar language. That exclusion is the brief: what reads as ordinary wear survives the walk-through, and what reads as damage is billed back to you.
The lease adds a second constraint. Most residential leases prohibit painting, drilling and unspecified “alterations” without written consent, and the word alteration is the landlord’s to define. The real question is not whether an upgrade looks good, but whether the wall, floor or cabinet door underneath can be handed back in the condition it was photographed in.
We research and compare these products rather than install them, and one pattern runs through the manufacturer documentation: almost every damage-free product fails because it went onto a surface it was never rated for. Nine upgrades below come apart cleanly, each with its cost, surface limits and removal step.
The Wall Finish Sitting Under Everything Adhesive
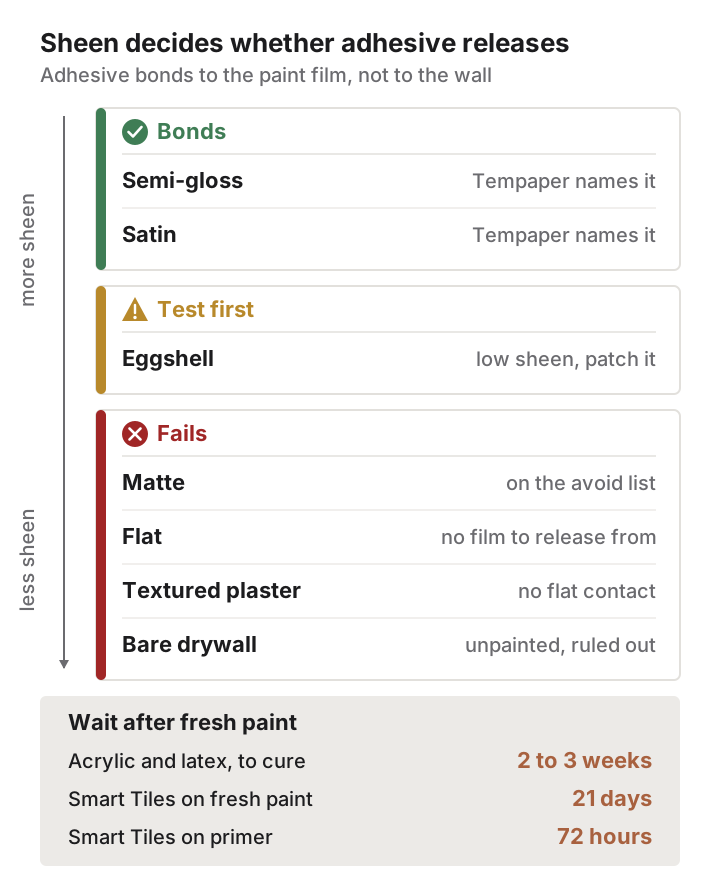
Adhesive products do not bond to your wall. They bond to the paint film on it, then release from that film. If the film is porous, chalky or still soft, the adhesive takes it along.
Sheen therefore matters more than color. Tempaper specifies a “satin or semi-gloss finish” and lists “matte, flat, and low sheen paints” as surfaces to avoid, along with textured walls (Tempaper installation guide). Flat paint leaves almost no continuous film to release from.
Cure time is the second variable, and it is not dry time. Sherwin-Williams defines cure time as “how long paint needs to exhibit optimum performance results,” separate from dry-to-the-touch, and puts acrylic and latex paints at “two or three weeks to cure” (Sherwin-Williams). Smart Tiles is stricter, asking for “21 days to ensure complete drying” on fresh paint and 72 hours on primer (Smart Tiles FAQ).
| Upgrade | Bonds to | Fails on | Wait after fresh paint | Removal step |
|---|---|---|---|---|
| Peel-and-stick wallpaper | Primed drywall in satin or semi-gloss | Matte, flat, low-sheen, textured | Full cure window | Lift a corner, pull parallel to the wall |
| Adhesive picture strips | Smooth painted wall, sealed wood, glass | Wallpaper, vinyl, brick, rough-sawn wood | Full cure window | Stretch the tab straight down, palm flat |
| Removable tile | Painted drywall, smooth ceramic, mirror | Textured wall, bare drywall, brick, stone | 21 days | Hair dryer, lift each corner, wash residue |
| Cabinet film | Sealed melamine, laminate, glass, MDF | Raw wood, chalky paint, deep grain | Full cure window | Warm, peel at a shallow angle, wipe |
| Cord raceway | Painted wall, baseboard, sealed trim | Textured plaster, bare drywall | Full cure window | Warm the channel, peel from one end |
1. Peel-and-Stick Wallpaper on One Accent Wall
Tempaper rolls measure 20.5 inches wide by 16.5 feet long and cover 28.18 square feet, at $60 a roll for the Swell pattern (Tempaper). An 8-foot by 10-foot wall works out to 80 square feet, so plan three rolls plus one for pattern repeat and trim waste: $180 to $240 for one wall.
Prep is short and non-negotiable. Wipe the wall with the 1:1 isopropyl alcohol and water solution Tempaper specifies, let it dry, then pull the outlet and switch plates.
Removal is where flat paint takes its revenge. Start at a top corner and peel “firmly, up or down slowly, parallel to the surface,” knuckles close to the wall rather than pulling the sheet toward you.
2. Tension Rods in Window Reveals and Closets
Budget $10 to $35 by span. A spring rod needs two opposing surfaces facing each other squarely: a window reveal, a closet, an alcove. A flat opening with no recess gives it nothing to push against.
Damage from a tension rod is slow and circular. Constant pressure through a rubber end cap burnishes a ring into the paint and can dent the drywall paper under a soft flat finish. Cut two 2-inch felt squares, stick one to each cap, and keep the load light.
To remove, twist the rod shorter until it drops free rather than pulling one end down and out. Clean the two contact circles with mild soap on a damp microfiber, not an abrasive melamine pad, which burnishes the sheen into a matte patch.
3. Adhesive Hooks and Strips, Read by Weight Rating
The rating is printed in the product name, and it decides everything. Command sells its Large Picture Hanging Strips as a 15 lb set of four pairs and an X-Large set rated for 20 lb, at $5 to $15 a pack.
Surfaces disqualify more of these than weight does. Wallpaper, vinyl, brick and rough-sawn wood all sit outside the rating, and so does any flat or chalky paint. Weigh the frame first and buy above your number; glass and a solid backer add more than people expect.
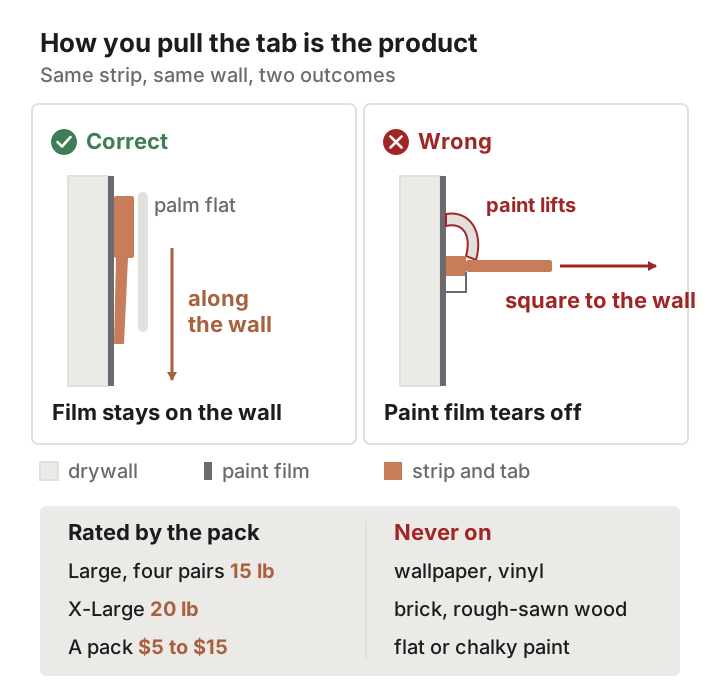
The removal geometry is the entire product. Pull the release tab straight down with your palm flat against the wall so the strip stretches along the surface; pull it outward and the strip levers the paint film off.
4. Removable Tile Across a Backsplash Run
Smart Tiles sheets run roughly 11.4 by 9 inches, sold in five-sheet packs covering about 3.5 square feet at $35 to $50 a pack in 2026. A 15-square-foot run behind a range takes four to five packs, so $150 to $250.
The exclusion list is worth reading twice. Smart Tiles rules out textured walls, unpainted drywall, porous wood, textured ceramic, brick and stone, plus shower interiors, floors, countertops and ceilings (Smart Tiles FAQ). Orange-peel texture is the common rental disqualifier, and pressure does not fix it.
Removal runs in three steps: heat each tile with a hair dryer to soften the adhesive, pull gently at each corner, then wash the wall to lift the glue left behind. Work one sheet at a time and reheat rather than forcing a cold tile.
5. Plug-In Sconces and the Cord Channel Beneath Them
A pair runs $40 to $120. The backplate is the problem, since most plug-in sconces ship with a keyhole slot that expects a screw. Hang it on a rated adhesive strip if the fixture sits well under that rating on smooth painted wall, or accept one small screw, which leaves a picture-nail hole.
Cord routing decides whether this reads as a fixture or a mess. A paintable adhesive-backed raceway kit costs $12 to $30 for 10 to 15 feet in roughly 1-inch channels, holding on painted wall, baseboard and sealed trim but not on textured plaster. Run it straight down to the baseboard, then along it to the outlet.
Do not paint the raceway if you intend to remove it, since paint bridges the seam between channel and wall and tears a strip off with it. To remove, warm the channel, peel from the bottom end at a shallow angle, then lift residue with a plastic putty knife.
6. Freestanding Shelving That Never Meets a Stud
Leaning ladder shelves, open etageres and floor-standing cube units run $80 to $400 and touch the wall without fastening to it. Most tall units still ship with an anti-tip strap meant to screw into a stud. If children or pets share the room, use it and patch the single hole later.
Otherwise keep freestanding pieces under about four feet, load the bottom shelf heavy, and put felt pads under every foot so hardwood or vinyl plank takes no impression. When the unit leaves, lift rather than drag, and check the wall behind the back panel for a burnish mark that a soft eraser sponge will take off.
7. The Landlord Fixture, Unscrewed and Boxed
This one costs almost nothing and buys the most. Builder-grade flush mounts, cabinet knobs and low-flow shower heads come off with a screwdriver and go back at the end. Replacements run $40 to $150 for a light and $2 to $8 per cabinet pull.
Follow the sequence so reversal stays possible: photograph the original in place, kill the breaker for anything wired, bag every screw and label the bag with the room, then box the fixture in a bin that lives in the closet. For cabinet hardware, measure the center-to-center distance between the existing screw holes and buy pulls that match it exactly. A pull that misses by one eighth of an inch means new holes drilled in the door.
Reinstall a week before the walk-through, not the morning of, so a missing screw is still a problem you can solve.
8. Cabinet Film Over Doors You Cannot Repaint
d-c-fix self-adhesive film comes in 17.71-inch and 26-inch widths on 78-inch rolls, roughly $15 to $35 a roll. It bonds to sealed melamine, laminate, glass and painted MDF, and will not hold on raw wood, deep grain or chalky paint.
The procedure rewards patience more than skill:
- Unscrew the doors and number the hinges with masking tape.
- Measure each door and cut a piece 1 inch oversize on all four sides, using the printed grid on the paper backing.
- Peel back 3 inches of backing, align the top edge, and tack it down.
- Squeegee from the center outward in 45-degree sweeps, releasing 3 more inches of backing at a time.
- Wrap half an inch onto the back face and trim the rest with a fresh blade.
To remove, run a hair dryer on low across a corner, lift, and pull at a shallow angle. Warm soapy water takes off whatever adhesive stays.
9. Area Rugs Over Flooring You Did Not Choose
A mid-size rug runs $150 to $700, and the pad under it, not the rug, is the reversibility component. Expect $40 to $90 for a needled felt pad bonded to natural rubber.
Read the flooring manufacturer’s care sheet before anything goes down on luxury vinyl or a factory-finished wood floor. The pad sits against that finish for two years, so it decides what the floor looks like when you roll everything up.
Lift the pad and inspect the floor beneath it a month before you move, not on move-out day. A discolored rectangle is the one outcome here that reads as damage rather than wear.
The Test Patch That Decides Whether Any of This Reverses
Every product above assumes a wall it has never met. The test patch is how you find out, and it is the step almost everyone skips, because it delays the interesting part by three days.
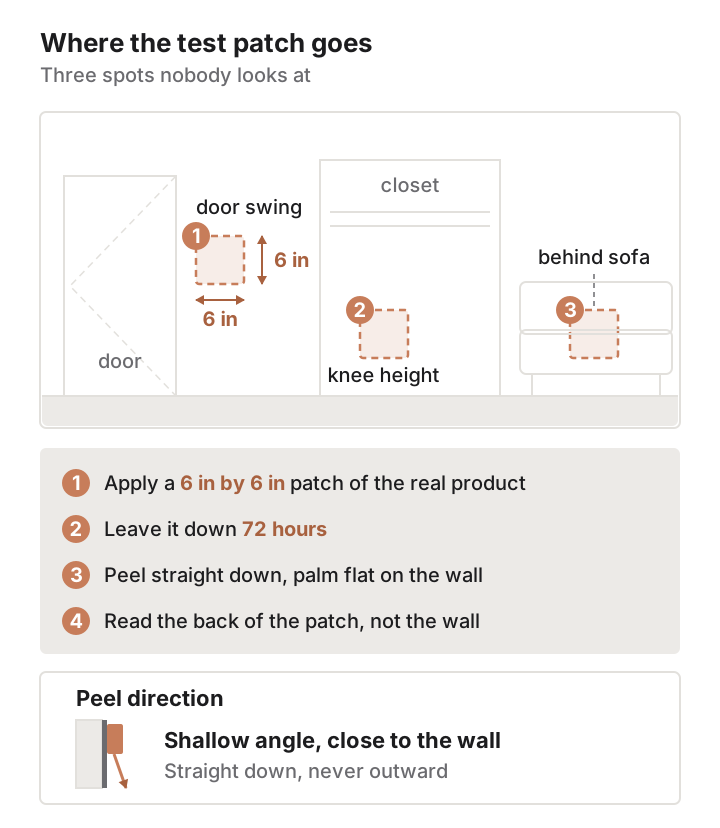
- Pick a spot nobody looks at: behind the door swing, inside a closet at knee height, or the low band of wall a sofa will cover.
- Apply a 6-inch by 6-inch square of the exact product to the exact surface, using the pack’s own prep instructions.
- Leave it 72 hours. Adhesive that has been down for ten minutes behaves nothing like adhesive that has been down for a year.
- Peel it off at a shallow angle, straight down, palm against the wall.
- Read the back of the patch instead of the wall. Paint flakes, chalky dust or a dull film stuck to the adhesive all mean the wall’s top layer came away with it.
- If the patch comes off clean, buy the full quantity. If it does not, the wall has told you no, and no technique overrides that.
Run this at the start of the tenancy, when the paint is at its oldest and hardest and doing nothing is still an option. Reversibility is not a property you buy with the product. It belongs to the surface, and the patch is the only way to ask it.