Cabinet Pulls Are Sized, Not Chosen
Center-to-center is the distance from the middle of one screw hole to the middle of the other. It is not the length of the handle and not the width of the grip. It is the spacing between the two holes you are about to drill, and listings abbreviate it as CC, C-C, or drill centers.
The confusion is predictable. Someone reads “6 inch pull” and pictures a handle six inches long, when the listing means six inches of hole spacing on a piece closer to eight inches end to end. Top Knobs defines the two terms separately: overall length runs end to end, while center-to-center is the screw hole spacing and the industry measuring standard.
Get that number wrong and nothing downstream rescues you. A pull ordered at 128 mm will not span holes bored at 96 mm.
Three Numbers on Every Pull Listing
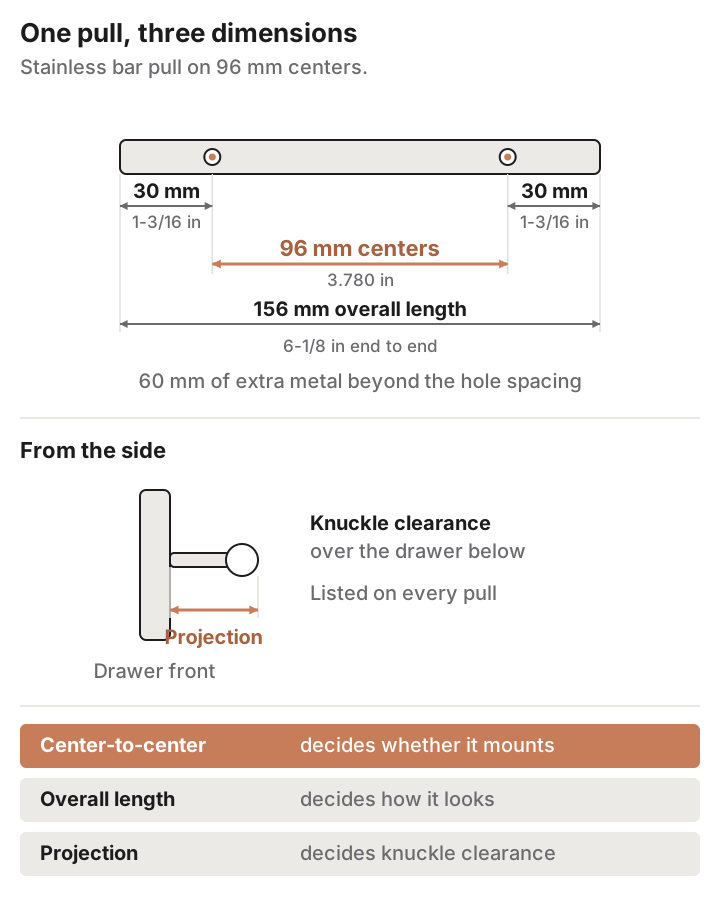
Every pull carries three dimensions, and they are not interchangeable. Center-to-center governs whether it mounts. Overall length governs how it looks. Projection, the distance the bar stands off the face, governs whether your knuckles clear the drawer below.
Take a real one. The Amerock Bar Pulls BP19011SS is a stainless bar pull on 96 mm centers with an overall length of 6-1/8 in, or 156 mm end to end. That is 60 mm of extra metal beyond the hole spacing, 30 mm of tail past each screw, about 1-3/16 in per end.
The Standard Center-to-Center Sizes in Both Systems
North American cabinet hardware lives in two measuring systems at once, and the sizes interleave without lining up.
| Metric centers | Exact inch equivalent | Commonly sold as | Inch centers | Exact metric equivalent |
|---|---|---|---|---|
| 64 mm | 2.520 in | 2-1/2 in | 3 in | 76.2 mm |
| 96 mm | 3.780 in | 3-3/4 in | 4 in | 101.6 mm |
| 128 mm | 5.039 in | 5 in or 5-1/16 in | 6 in | 152.4 mm |
| 160 mm | 6.299 in | 6-5/16 in | 8 in | 203.2 mm |
| 192 mm | 7.559 in | 7-9/16 in | 10 in | 254 mm |
| 224 mm | 8.819 in | 8-13/16 in | 12 in | 304.8 mm |
| 256 mm | 10.079 in | 10-1/16 in | 18 in | 457.2 mm |
Berenson publishes the same conversions in fractional inches, listing 96 mm as 3-25/32 in and 128 mm as 5-1/16 in. Note the trap in row three: a 5 in pull is 127 mm, a 128 mm pull is 5.039 in, and sellers list both as “5 inch.”
A 3/16 in bit cuts a 4.76 mm hole, the screw is thinner still, and that leftover side play is your whole tolerance for the one millimeter difference.
Pull Length Against Drawer Width and Door Height
The proportional convention most manufacturers publish is a one-third rule. Top Knobs states that a bar pull should not exceed one third of the drawer width or door length; KraftMaid puts it as a 1:3 ratio, with a 4-inch pull on a 12-inch drawer face as the example.
Top Knobs breaks it into bands. Drawers under 16 in take one pull of 3 to 5 in; drawers from 16 to 32 in take two pulls of 5 to 7 in or one pull of 9 to 12 in; anything wider needs more than 12 in. Doors follow the same logic vertically: 3 to 7 in below 24 in of height, 7 to 12 in from 24 to 36 in, longer than 12 in above that.
Read those bands carefully: they are quoted as pull length, not center-to-center. A pull with 30 mm past each hole needs roughly 60 mm less in centers than the band suggests.
Knobs, Pulls, and the Cabinets That Decide Between Them
A knob has one hole, so there is no spacing to get wrong. Knobs suit upper doors, small top drawers, glass fronts, and inset doors with narrow stiles, where the hand arrives at a point rather than sweeping an edge. KraftMaid adds a constraint worth measuring: the knob must not be wider than the door frame it sits on, so a 2 in stile caps knob diameter near 1-3/4 in.
Pulls earn their place where the hand works against weight. On deep pan drawers, trash pullouts and appliance panels, a knob puts the whole pulling force on one screw.
Appliance Pulls and Pre-Drilled Panels
Appliance pulls are a separate category, not just longer cabinet pulls. Top Knobs lists them from 12 to 30 in, for doors taller and drawers wider than 36 in. Tails grow with the bar, so check overall length against the panel width rather than the centers alone.
One rule overrides proportion here. Panel-ready refrigerator and dishwasher fronts often arrive with a hole pattern the appliance maker specified, and that pattern is not negotiable. Measure the panel, check its thickness against the screw length in the box, and buy to the existing holes. Drilling the panel is hardware work. The appliance behind it is not: a dishwasher’s supply line and drain are a licensed plumber’s connections and its power feed a licensed electrician’s, each made to the plumbing and electrical codes your municipality has adopted.
Placement: Drawer Centers, Door Stiles, and the Corner Offset
KraftMaid publishes three placement conventions that cover most kitchens. On a framed door with a center panel, traditional placement puts the hardware where the vertical and horizontal center lines cross, while modern placement centers it on the stile but holds it level with the frame rail edge.
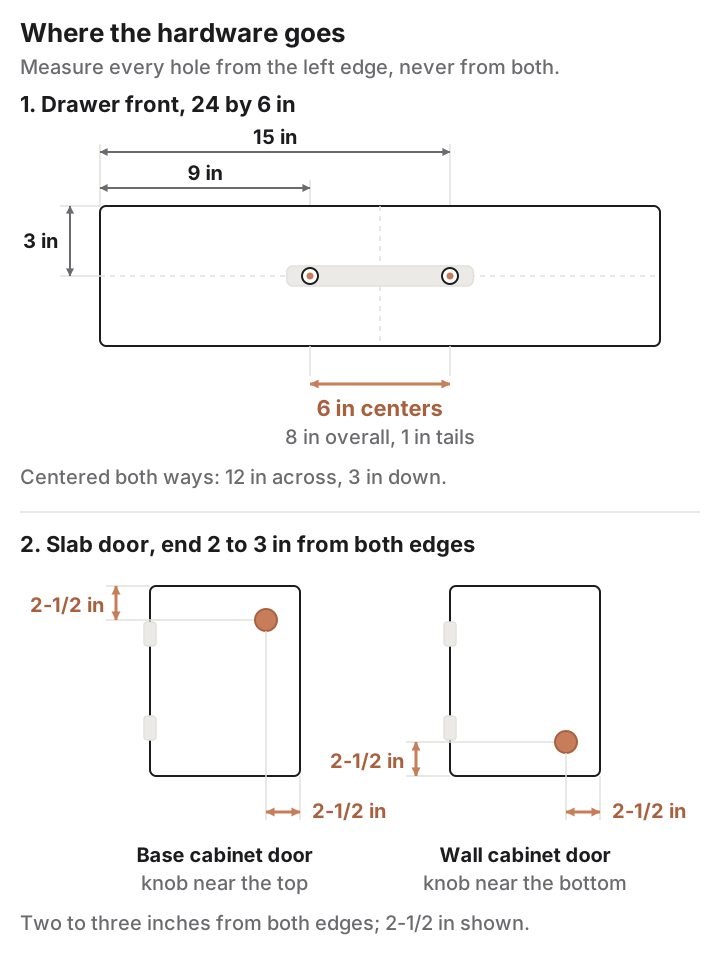
On a slab door, put the knob, or the end of the pull, two to three inches in from both edges. That phrasing matters: it is the end that sits two to three inches from the corner, not the screw hole, so a pull with 1-3/16 in tails carries its hole closer in. Splitting that range at 2-1/2 in gives you one number to repeat on every door in the run.
Drawers get centered both ways, or centered left to right and set two to three inches down from the top on tall fronts. Base cabinet doors take hardware near the top corner, wall cabinet doors near the bottom, because that is where the hand arrives.
Edge-Bore and Center-Bore Referencing
Every hole you drill is measured from something. Edge-bore work references the edge of the door or drawer front: the jig sits against that edge, and every hole is a fixed offset from it. Center-bore work finds the centerline first and places the holes symmetrically about it.
The choice is not stylistic. Fronts in a real run vary, sometimes by a sixteenth across supposedly identical drawers. Edge-referenced holes stay consistent to the edge, so the pull drifts off center; center-referenced holes stay centered, so the edge distance varies.
Doors want edge referencing: they hang in pairs with a visible gap, and the eye reads the gap before the center. Graduated drawer banks want center referencing, so a 24-inch and a 30-inch front in one stack both look centered.
Drilling a 24-Inch Drawer Front, Step by Step
Work the numbers first. A 24 in wide, 6 in tall drawer front at one third gives an 8 in target overall length, which a 6 in center-to-center pull with 1 in tails hits exactly.
- Lay the front face up over a sacrificial backer board.
- Measure and write down the actual width and height. For this example, 24 in and 6 in.
- Mark the vertical center at 3 in down from the top edge and draw a light pencil line across the middle third.
- Mark the horizontal center at 12 in from the left edge, squared to that line.
- Measure 9 in from the left edge along the centerline and mark hole one. That is 12 in minus half of the 6 in spacing.
- Set your rule’s zero on that mark and measure exactly 6 in to hole two, at 15 in from the left edge. Never measure hole two from the right edge; a front a sixteenth over gives 6-1/16 in centers and the pull will not seat.
- Press masking tape over each mark and re-punch the center with an awl. The tape stops the bit wandering and protects the finish.
- Drill both holes with a 3/16 in bit, held perpendicular, working from the face side into the backer board.
- Deburr the exit side with a light pass of the same bit turned by hand.
- Test fit with the screws it shipped with, checking screw length against the front’s thickness.
What a Hardware Jig Sets, and What It Does Not
Jigs replace steps 3 through 7 on the second and fortieth front, not on the first. The Kreg KHI-PULL sells for $32.99 and carries a movable edge guide covering 1 in to 5 in (25 mm to 127 mm) from edge to hole center, with drill guide detents at 2-1/2, 3, 3-1/2, 4, 4-1/2 and 5 in plus 64, 96 and 128 mm. It needs a 3/16 in (5 mm) bit, not included.
There is no 160 mm or 192 mm detent, so those get set by hand on the built-in scale, and the 5 in edge limit puts a centered pull on a 24-inch front out of reach.
Rockler’s Jig-It Cabinet Hardware Pro Drilling Guide, item 53038, takes a different approach at $49.99. You bolt the actual pull into the two guides to set the spacing, so the center-to-center number is never transferred or mistyped. It handles posts up to 7-1/2 in apart and includes a 3/16 in split-point bit.
Neither jig finds the center of a drawer front, and neither squares a front that arrived out of square. A jig repeats a decision; it does not make one.
Existing Holes That Do Not Match the New Spacing
Measure before you shop. With the old hardware mounted, measure from the left edge of one screw shank to the left edge of the other, which equals center-to-center on equal-diameter posts. With it off, measure hole center to hole center. Then buy that number: 3 in, 96 mm, 4 in and 128 mm are all stocked in volume.
When you must move the holes, run the arithmetic before committing. Going from 3 in centers to 96 mm pushes each hole outward by 0.39 in, a hair over 3/8 in. Plug a 3/8 in hole on the old bore and the new 3/16 in hole leaves roughly 1/8 in of solid material between them, workable but thin. Going from 96 mm to 128 mm moves each hole 16 mm, about 5/8 in, with room to spare.
The repair depends on the front. Painted wood takes two-part filler, sanding, spot priming and a repaint of that face. Stained wood shows the plug under any finish worth having, and thermofoil or laminate cannot be filled invisibly.
Converting knobs to pulls leaves one old hole between two new ones. Measure the pull body at its midpoint before assuming it hides anything; a slim bar profile can be barely wider than the 3/16 in hole it must cover.
The Measurements to Record Before You Order
Six numbers, written down, before anything goes in a cart: the width and height of your widest drawer front; the height of your tallest door; the stile width on framed doors, which caps knob diameter; the front thickness, which sets screw length; the existing center-to-center spacing for every distinct hole pattern; and the spacing the appliance manufacturer specified for any panel-ready front.
For holes that do not match, the order of preference is short. Buy hardware in the existing spacing. Failing that, buy a pull with a backplate wide enough to cover the old bores. Fill and refinish only on painted wood, and replace the front outright when it is thermofoil, laminate, or stained.