Primer Does Three Jobs, and Skipping It Costs More
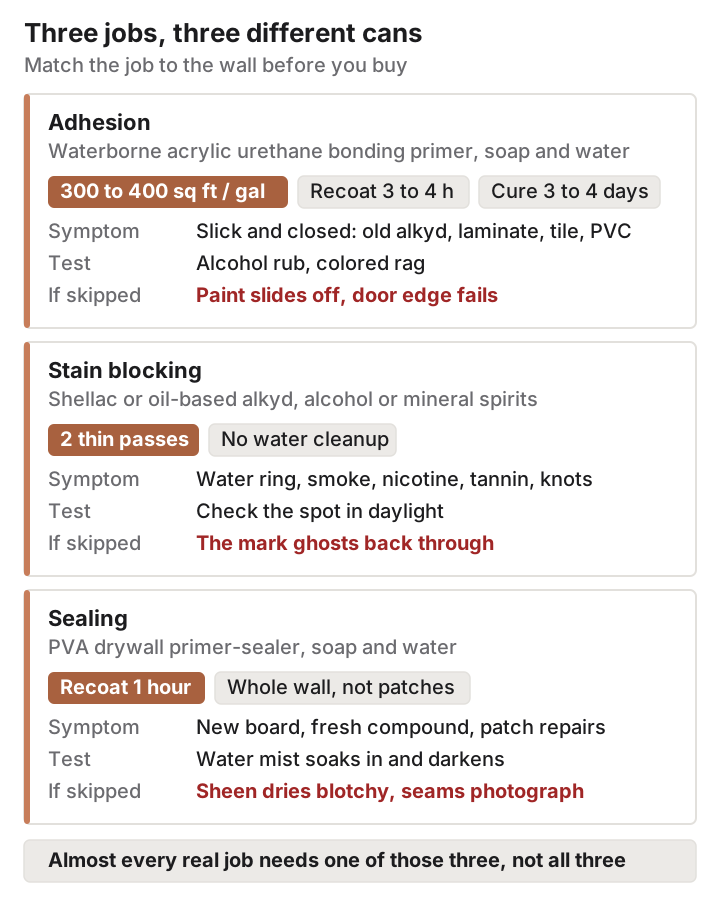
Primer sells as one product and performs three separate jobs. It grips surfaces that paint would otherwise slide off. It buries marks that would ghost back up through the finish coat. It evens out how fast a surface pulls in the topcoat, so the sheen dries uniform instead of blotchy.
Almost every real job needs one of those three, not all three. The costly mistakes come from buying the wrong function, not from buying nothing. A bonding primer will not stop a water ring, and a heavy stain blocker on a slick door is money spent on hiding power the door never needed.
Adhesion, Stain Blocking, and Sealing Are Three Different Chemistries
Adhesion primers exist because some surfaces give paint nothing to hold onto. Old alkyd enamel on trim, laminate, ceramic tile, PVC, and factory-finished doors are all slick and closed. Benjamin Moore’s Insl-X Stix, product code SXA-110, is an acrylic urethane written for exactly that list; the manufacturer puts coverage at 300 to 400 square feet per gallon, recoat at 3 to 4 hours, and full cure at 3 to 4 days.
Stain blockers are a different animal. Zinsser B-I-N is shellac-based and Zinsser Cover Stain is oil-based, and both are sold specifically for water rings, smoke, nicotine, and the tannin that bleeds out of knotty pine, cedar, and redwood. A standard latex primer is not sold for that work. The carrier is the practical split: B-I-N cleans up with denatured alcohol, Cover Stain with mineral spirits, and neither with water.
Sealing is the quietest of the three and the step most often skipped. Sherwin-Williams describes its PVA Interior Latex Primer & Sealer as a product for interior drywall and masonry that gives good uniformity under any recommended topcoat, with a dry time that allows recoat in one hour. That is the sealing job stated plainly: make the whole surface behave like one material before the color goes on.
| Primer type | Job it does | Named example | Cleanup | What it will not fix |
|---|---|---|---|---|
| Waterborne acrylic urethane bonding primer | Adhesion on slick, closed surfaces | Insl-X Stix (SXA-110) | Soap and water | Water rings, smoke, tannin bleed |
| Shellac-based primer-sealer | Stain and odor blocking, plus grip on gloss | Zinsser B-I-N | Denatured alcohol | Broad exterior use; it is sold for interior and exterior spot priming |
| Oil-based alkyd stain blocker | Tannin and water stains on wood | Zinsser Cover Stain | Mineral spirits | Odor and speed; it is the slowest of the three to work with |
| PVA drywall primer-sealer | Uniform porosity over board and compound | Sherwin-Williams PVA Interior Latex Primer & Sealer | Soap and water | Adhesion over gloss, and stains |
Two Checks That Tell You Which Job the Surface Needs
Denatured Alcohol on Painted Trim
Dip a cotton ball in denatured alcohol and rub a small, low-visibility patch of the trim. Glidden’s guidance is direct about the result: if the paint comes off it is water-based, and if it does not come off it is oil-based and needs a bonding primer before latex goes over it. Use a colored rag rather than white cotton when the existing paint is white, or the transfer will not show.
A Mist of Water on Patched Drywall
Spray a fine mist across a wall that has been patched or newly finished, then watch how it behaves. Bare joint compound tends to soak the water in and darken; a sealed or painted face tends to hold droplets on the surface longer. Treat that visible difference as the signal that a sealing primer belongs on the wall, because it is the same difference the topcoat will meet.
Bare Drywall, Joint Compound, and Joints That Photograph
Drywall finishing is graded, and the grade tells you how visible the seams will be. National Gypsum notes that a Level 4 finish suits smooth walls decorated with flat paints and light textures, and is not recommended where non-flat or dark, deep-tone paints will be applied. Level 5 adds a skim coat to give a uniform surface and minimize the possibility of joint photographing or fasteners showing through the final decoration.
That is a finishing standard rather than a primer standard, but it tells you where flashing turns up: gloss, deep colors, and raking light. On a satin navy wall lit from one side, every taped seam reads as a slightly different sheen, and no second coat of color fixes it.
Above flat, prime the whole wall rather than the patches, since a spot-primed repair under eggshell often reads as a soft rectangle.
Glossy Trim, Deglossing, and Oil Underneath
Gloss has to be dulled, chemically or mechanically, before anything reliable sticks to it. Benjamin Moore’s grit guidance puts medium grits at 100 to 150 for dulling previously painted surfaces, with 40 to 80 reserved for stripping and 180 to 220 and finer for smoothing between coats. On carved profiles and louvered doors, sanding is miserable, and a liquid deglosser such as Klean-Strip Liquid Sandpaper is the practical alternative.
Stix is marketed as bonding to glossy surfaces without sanding in most cases. A light scuff on anything that gets handled daily is still the cautious reading of that claim, since the scuff costs ten minutes and a failed door edge costs the whole door.
Water Rings, Smoke Damage, and Tannin on Knotty Wood
Find the leak before you find the primer. A ceiling ring that reappears three weeks after painting is a plumbing result, not a paint result, and shellac will not argue with an active drip. Chasing that water back to its source inside a wall or ceiling calls for a licensed plumber; where the stain sits under failing roofing, it is a roofer’s call instead. Once the source is repaired and the cavity is dry, spot prime the stain, let it flash off, then check it in daylight before committing to a full coat.
Knots and sap streaks are the other case where the primer choice is not optional. B-I-N is sold for spot priming knots and sap streaks and for sealing tannin, and Cover Stain covers the same territory on a slower oil schedule. Two thin passes beat one heavy one, with the first flashed off before the second.
Smoke damage is a stain plus an odor. Shellac covers both counts, and B-I-N is sold for sealing smoke and pet odors. Ventilate hard while you work, because the alcohol carrier is aggressive in a closed room.
Patching Compounds and the Waiting They Cost
Lightweight ready-mixed spackling is the pick for nail holes and small dings, and it sands with almost no effort. Setting-type compounds, sold as Sheetrock Easy Sand in numbered working-time grades, are the pick for deeper fills and for anything you need to recoat the same afternoon; they are sold by working time rather than by drying time, which is the practical distinction.
DAP’s DryDex removes the guesswork on the small stuff. It goes on pink and turns white, and DAP’s instructions specify that repairs deeper than an eighth of an inch go in layers, each layer dry before the next. Judge readiness by the color, not by the clock, since depth and humidity both move the timeline.
The Preparation Sequence, in Order
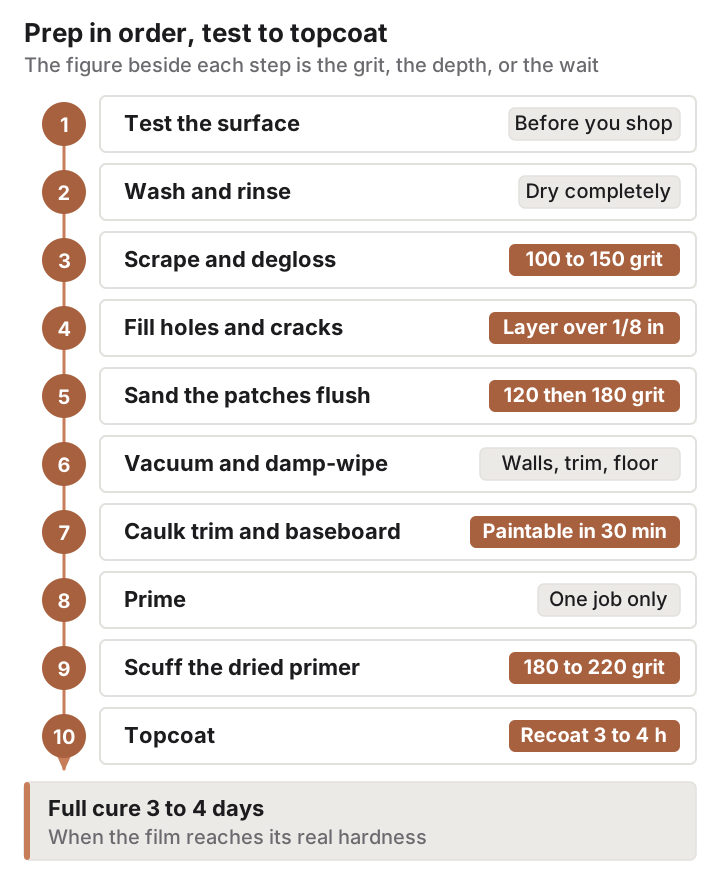
- Test first. Run the alcohol rub on trim, and mist water on patched drywall. The results decide which primer you buy, so this happens before the shopping trip.
- Wash and rinse. Kitchen and bath surfaces carry grease and soap film, and primers are made to bond to the surface rather than to the film sitting on it. Let the surface dry completely.
- Scrape anything loose, then dull the gloss with 100 to 150 grit or a liquid deglosser. Wipe the residue off.
- Fill holes and cracks. Layer anything deeper than an eighth of an inch, and wait for the full label time for the depth you filled, not for the surface to look dry.
- Sand the patches flush, 120 grit to level and 180 to finish. Run your bare hand over each one; fingertips find ridges that eyes miss.
- Vacuum the walls, the trim, and the floor, then wipe with a barely damp cloth.
- Caulk gaps at trim, casing, and baseboard now, after the dust is gone. DAP lists Alex Plus as paintable 30 minutes after application, and rushing it puts a wet bead under a wet coat.
- Prime the one job the surface needs.
- Scuff the dried primer with 180 to 220 grit, then wipe again. Primer tends to raise fibers on bare drywall and grain on bare wood.
- Topcoat. Give a bonding primer the manufacturer’s 3 to 4 hours before recoating, and remember that full cure at 3 to 4 days is when the film reaches its real hardness.
Grit Sequence and Dust Control Before the First Coat
Work top to bottom, vacuum as you go rather than at the end, and use a HEPA-filtered vacuum if you have one. Follow it with a damp cloth, which picks up the fine dust that drifts and settles back down.
Age matters here more than any other prep decision. The EPA advises that renovation in homes built before 1978 can create dangerous lead dust, and recommends misting surfaces before sanding, using wet-dry sandpaper, and cleaning with a HEPA vacuum. The federal Renovation, Repair and Painting rule generally does not apply to homeowners working on their own home, but any paid contractor doing the work must be lead-safe certified, and the rule also catches homeowners who rent the property out or run a child care business in it. State and local rules can be stricter than the federal floor, and a certified lead professional is the right call when paint is flaking in an older house.
What Priming a 12-by-14 Bedroom Costs in Product
A bedroom 12 by 14 feet with 9 foot ceilings has a perimeter of 52 feet, so the gross wall area is 468 square feet. Subtract one 3 by 7 foot door at 21 square feet and two 3 by 5 foot windows at 15 square feet each, and 417 square feet of wall remains.
At the low end of a 300 square feet per gallon spread, that is 1.39 gallons for a full sealing coat, so a gallon plus two quarts covers it with margin. Compare that against spot priming: fourteen patches at roughly 6 by 6 inches is 0.25 square feet each, or 3.5 square feet total. The decision between one quart and a gallon and a half is exactly the decision between the stain-blocking job and the sealing job.
Reading the Wall Before You Open the Can
Stand in front of the surface and ask three questions in order. Is anything on it that could come back through, meaning a ring, a scorch, a marker line, a knot? If yes, buy a stain blocker; the rest is secondary.
If nothing will bleed, ask what the surface is made of. Slick, closed, previously oil-painted, or factory-finished points to a bonding primer, and the alcohol rub settles it in under a minute.
When the surface is neither stained nor slick, ask whether it absorbs evenly. New board, fresh compound, or a patchwork of repairs under anything glossier than flat means the sealing job, and it means priming the whole wall rather than the repairs. Most rooms answer only one of those three questions with a yes, and that answer is the primer you buy.