Curtain Height, Width, and Length: The Numbers Before You Order

A panel that stops four inches above the floor is not a small miss. It puts a hard horizontal line in mid-air, and below that line the wall stays fully exposed from hem to baseboard. The eye finds it immediately. Four inches of visible wall under a curtain cuts the vertical run of the fabric short and makes the whole window read as if it is hovering rather than sitting in the wall.
That gap is rarely a fabric problem. It is an arithmetic problem, and it starts the moment someone measures the window instead of measuring the hardware. Curtains hang from a rod, not from the casing, so every figure that matters begins at the rod and ends at the floor.
Rod Height: The Distance From Casing to Ceiling
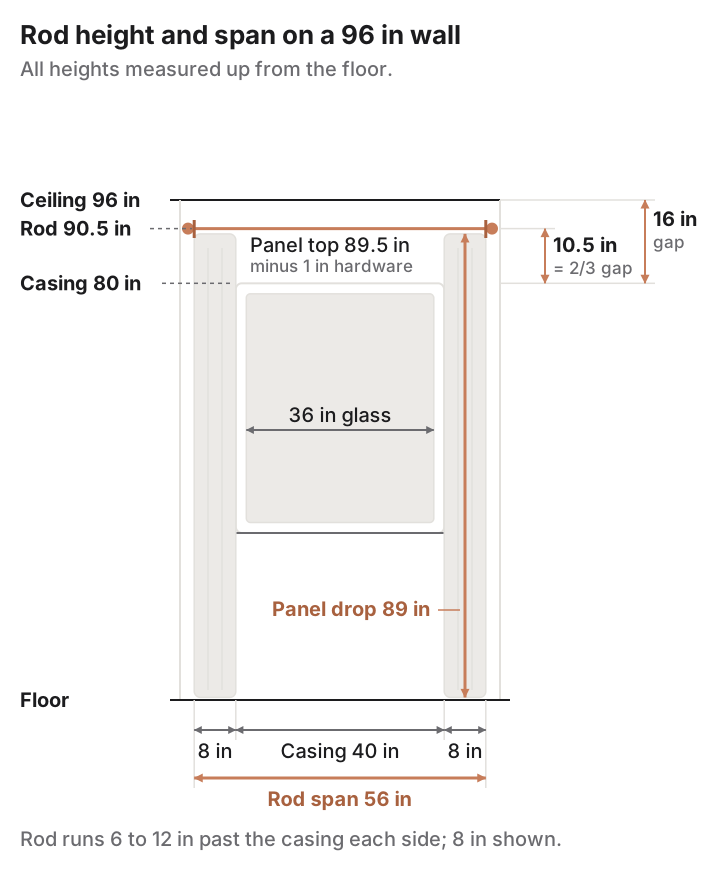
Begin at the top, because the top governs everything under it. The Shade Store’s measuring guide places the rod “a little more than halfway or about two-thirds of the way up” the space between the top of the window and the ceiling, in its five-step measuring guide. Run that against a standard eight-foot wall and the math is quick. Ceiling at 96 inches, casing topping out at 80 inches, a 16-inch gap, two-thirds of which is roughly 10.5 inches, putting the rod near 90.5 inches off the floor.
Record that as rod center height, not bracket height. Most decorative brackets cradle the pole above the screw holes, so the pole ends up an inch or so higher than the mark you drilled. Measure to the middle of the pole once it is up, or add the bracket offset from the packaging before you commit.
The Ceiling-Mount Track Alternative
When less than about four inches of bare wall sits between the casing and the ceiling, or when crown molding occupies that band, a ceiling track solves what a wall bracket cannot. IKEA’s VIDGA single track rail is 55 inches long, arrives with two ceiling fittings, carries up to 11 pounds, cuts down with a hacksaw, and lists at $25. A track suits this situation because it removes the height decision entirely: the rail goes where the ceiling is.
Ceiling mounting changes the length math in one direction only. Your drop is now ceiling height minus the glider drop minus your floor clearance, which on a 96-inch ceiling lands somewhere near 94 inches. An 84-inch panel is not in the conversation anymore.
Rod Width and Stackback: How Far Past the Casing
Stackback is the wall real estate the bunched panels occupy when they are open. Get it wrong and the panels sit permanently over the glass, dimming the room they were supposed to dress. The Shade Store recommends running the rod 6 to 12 inches beyond each side of the frame for an outside mount.
Work an example. A window with 36 inches of glass and 40 inches of outside casing, extended 8 inches per side, needs 56 inches between brackets. Finials live outside the brackets, so overall rod length is longer than the usable span, and the number you shop with is the bracket-to-bracket figure.
Minimum extension matters as much as maximum. The Umbra Cappa curtain rod is a 1-inch rod adjusting from 66 to 120 inches, supplied with two brackets, two matching finials, screws and drywall anchors, listed at $74 in nickel. For the 56-inch span above, that rod cannot compress far enough. Check the bottom of the range, not just the top.
Panel Fullness: Multiply the Rod, Not the Window
Fullness is a ratio applied to the rod span, and this is where most orders go thin. The formula is short: rod span multiplied by your fullness ratio, divided by the number of panels, gives the minimum flat width each panel must be. For that 56-inch span at 2x across two panels, each panel needs at least 56 inches of flat width.
The Shade Store’s guide suggests multiplying the width the drapery will cover by 1.5 or 2 for standard fabrics, and notes that thinner materials like sheers may need about 2.5x or 3x that width to avoid looking underfed. Header type shifts the sensible ratio further, because each header gathers cloth differently.
| Header type | Common fullness range (x rod span) | Reason |
|---|---|---|
| Grommet | 1.5x to 2x | Grommet spacing sets the wave depth; surplus cloth jams the stack |
| Rod pocket | 2x to 2.5x | The gather is the entire look, and a shallow gather reads as an error |
| Pinch pleat | 2x to 2.5x | Pleats are sewn, so fullness is fixed at the workroom rather than at the rod |
| Tab top | 1.5x to 2x | Tabs sit far apart; heavy fullness clumps at every loop |
| Sheers, any header | 2.5x to 3x | Thin cloth looks sparse below this range |
Finished Length: Sill, Apron, Float, Break, and Puddle
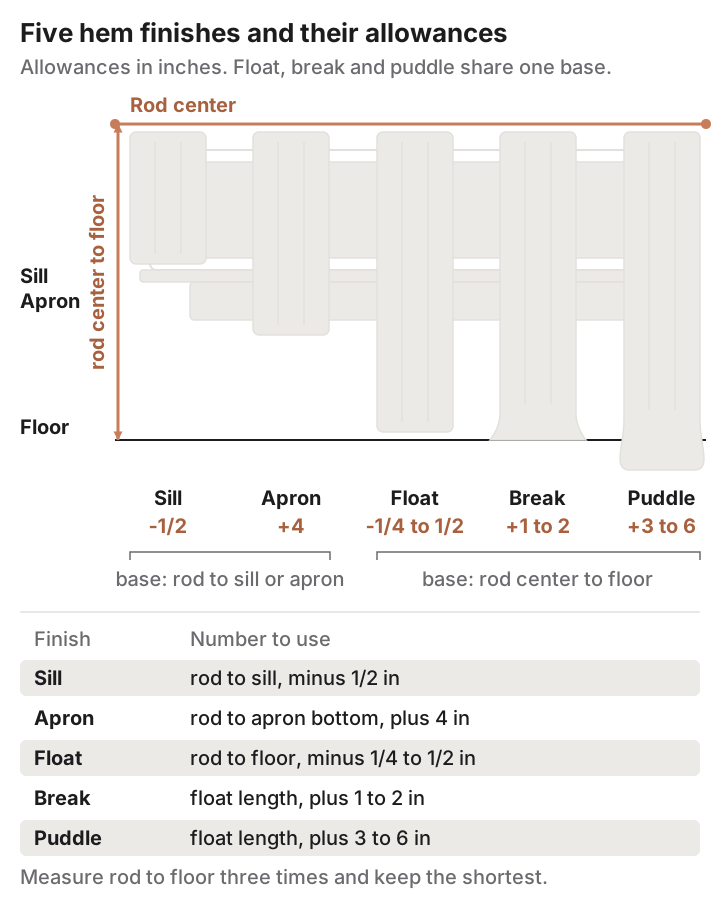
Five finishes are in normal use, and each is a different number, not a different mood. Float, break and puddle are all defined against one base measurement: rod center to floor.
| Finish | Where the hem lands | Number to use |
|---|---|---|
| Sill | level with the windowsill | rod to sill, minus 1/2 inch |
| Apron | below the trim beneath the sill | rod to apron bottom, plus 4 inches |
| Float | just clear of the floor | rod to floor, minus 1/4 to 1/2 inch |
| Break | one soft fold at the floor | float length, plus 1 to 2 inches |
| Puddle | fabric pools on the floor | float length, plus 3 to 6 inches |
The float, break and puddle figures follow The Shade Store’s stated allowances: subtract a quarter or a half inch for float, add 1 to 2 inches for break, add 3 to 6 for puddle. Take the rod-to-floor reading three times, at the left bracket, at the center, and at the right bracket. Old floors drift, and using the shortest of the three readings is what keeps a hem off the boards.
Standard Drop Lengths on the Shelf: 63 to 120 Inches
Ready-made panels are sold at 63, 84, 96, 108 and 120 inches, as summarized in this curtain length guide. Those five numbers are the whole shelf in most stores, and none of them will match your calculated drop exactly.
One exception is worth knowing before you shop. Panels drafted in metric arrive at odd inch figures: IKEA’s MERETE room darkening curtains are 57 inches wide by 98 inches long per panel, 100 percent cotton, sold as a pair at $44.99. That 98 comes from 250 cm, and it is two inches of extra drop that a 96-inch shopper would never think to look for.
Now map your number onto the shelf. A rod at 90.5 inches with a 1-inch hardware drop gives a panel top at 89.5 inches, and a float finish needs about 89 inches of drop. An 84 leaves you 5 inches short, which is worse than the four-inch gap that opened this piece. A 96 leaves 7 inches to hem, which is a straightforward alteration and the correct choice.
How the Header Moves the Top of the Panel
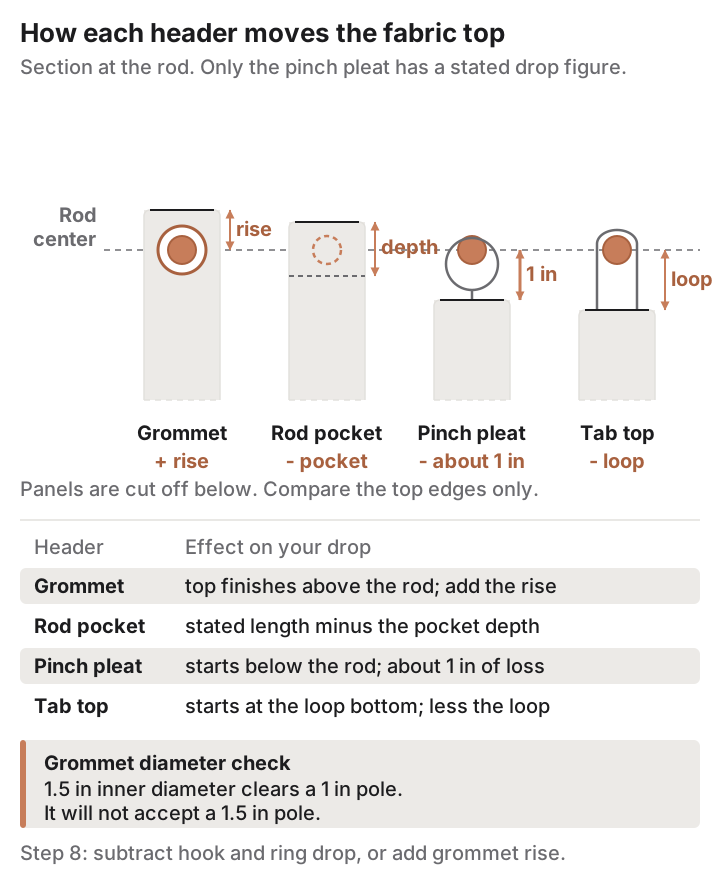
Every header repositions the fabric relative to the rod, and the stated panel length is measured on the panel, not from the rod. Four common headers behave in four different ways.
Grommet
The rod passes through the metal ring, so the top edge of the fabric finishes above the rod. Your hanging height is rod center plus the distance from grommet center to the panel’s top edge, which you can measure with a tape on the folded panel in about ten seconds. Diameter compatibility is a separate trap: the MERETE grommets have a 1.5-inch inner diameter, which clears a 1-inch pole comfortably and will not accept a 1.5-inch one.
Rod Pocket
The pocket swallows the pole, so the usable drop is the stated length minus the pocket depth. Panels with a header ruffle above the pocket sit higher still, since the visible top edge stands proud of the rod by the ruffle height. Measure pocket depth and ruffle height before you assume the label length is the drop.
Pinch Pleat
Pleated panels hang from pin hooks into rings or gliders, so the fabric starts below the rod, not level with it. Subtract the ring eye plus the hook drop, commonly around an inch of combined loss. Pin depth is adjustable on most pleats, which gives you a small height correction after installation without touching the hem.
Tab Top
Fabric begins at the bottom of the tab loop, so the loop length comes straight off your drop. Measure one loop from the rod line to the seam where the tab meets the panel, then subtract it.
A Nine-Step Measuring Sequence for One Window
- Measure floor to ceiling at the window wall. Write it down.
- Measure floor to the top edge of the window casing.
- Subtract step 2 from step 1 for the gap, multiply that gap by 0.67, and add the result to the casing height. That is your rod center height.
- Measure the outside width of the casing, trim edge to trim edge.
- Add 6 to 12 inches per side to step 4. That is your bracket-to-bracket rod span.
- Choose panel count and fullness ratio, then divide span times ratio by panel count for minimum flat width per panel.
- Measure rod center to floor at the left bracket, the center, and the right bracket. Keep the shortest figure.
- Adjust step 7 for your header: subtract hook and ring drop, or add grommet rise.
- Apply your chosen finish from the length table, then compare the result to 63, 84, 96, 108 and 120 and pick the next size up.
Do this once per window rather than once per room. Windows on the same wall are frequently set at different heights by a half inch or more, and a single rod line across two mismatched casings needs the taller casing to drive step 3.
The Numbers to Carry Before You Order
Eleven figures cover a window completely, and they fit on an index card:
- Ceiling height at the window wall
- Floor to top of casing
- Rod center height off the floor
- Outside casing width
- Bracket-to-bracket rod span
- Rod diameter
- Panel count and fullness ratio
- Minimum flat width per panel
- Rod center to floor, shortest of three readings
- Header drop or rise, in inches
- Required finished drop
Carry all eleven, including the ones that feel redundant. Rod diameter alone decides whether a grommet panel goes on the pole at all, and the shortest of three floor readings is the difference between a hem that clears and a hem that drags. None of this needs anything beyond a step ladder and a tape measure, and every figure is far cheaper to settle on paper than to discover four inches above the baseboard.