Grout Decisions That Outlast the Tile
A tiled surface almost never fails at the tile. Porcelain, which ANSI A137.1 defines as tile absorbing 0.5% water or less, shrugs off abrasion that would ruin most floor coverings. What gives way is the ribbon between the tiles: softer, more porous, and the only part of the assembly a scrub brush ever reaches.
That ribbon does mechanical work nobody credits it with: it absorbs the dimensional variation between one tile and the next, takes the chipping load at every edge, and bridges two rigid pieces that expand at different rates. Choosing grout decides which failure mode you accept and how many hours a year you spend on upkeep.
Joint Width Is Set by the Tile, Not by the Look You Want
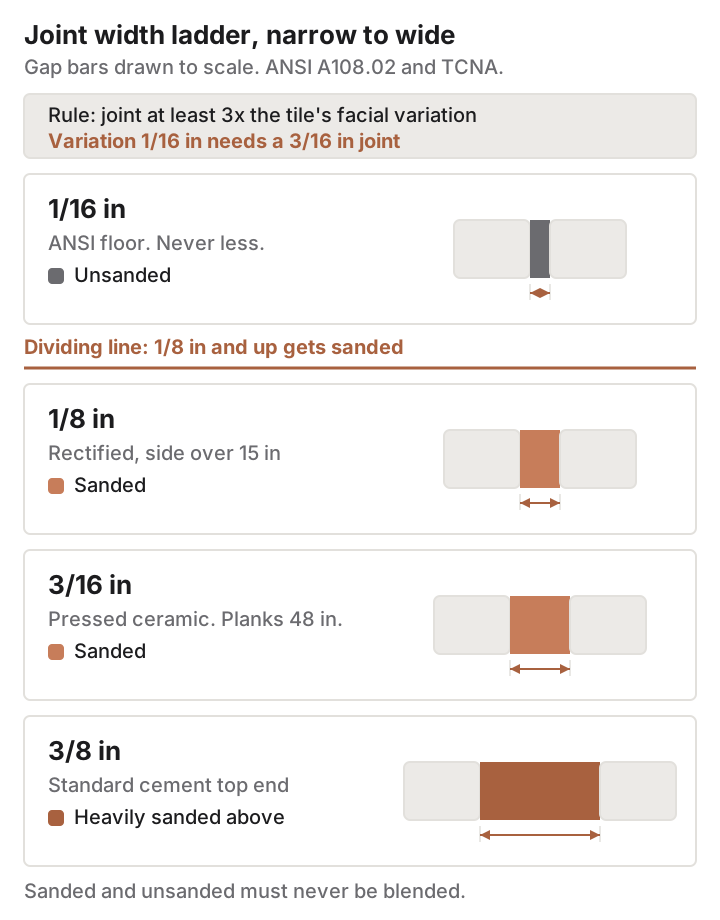
Joint width is a dimensional allowance, not a styling choice made after the tile arrives. ANSI A108.02 section 4.3.8 requires the actual joint to run no narrower than triple the facial-dimension variation of the tile supplied, and works the example through: where one tile differs by 1/16 inch across its face, the joint has to reach 3/16 inch. An absolute floor of 1/16 inch sits under that in the same section, and subsection 4.3.8.1 adds a rule for tile whose longest side passes 15 inches: joints there average 1/8 inch minimum on rectified tile, 3/16 inch on calibrated, non-rectified tile.
Pressed ceramic, whose edges leave the press with real size scatter, lands near 3/16 inch. Rectified tile, ground to a tighter face dimension after firing, tolerates 1/8 inch. Planks are the trap: rectified edges tempt you toward a hairline, but warpage across a 48 inch length makes 3/16 inch safer.
One caution on every ANSI figure below: these are consensus industry standards, not building code. They bind when a specification or a manufacturer’s instruction invokes them, and where they disagree with your local code or the printed bag, the code and the bag win.
Sanded, Unsanded, and the 1/8 Inch Dividing Line
Sand in grout is aggregate, not filler: it stops the cement paste shrinking as it cures. Remove it and the mix shrinks more, which is why unsanded grout dishes and cracks in a wide joint. Add it to a joint too narrow for the grains and the grout will not compact.
TCNA draws the line plainly: for cementitious grout, joints smaller than 1/8 inch should generally get unsanded and joints of 1/8 inch and larger should get sanded. Past 3/8 inch you move to a heavily sanded or wide-joint mix. The same page warns never to blend the two, and never to put sanded grout against marble or any surface the aggregate can scratch.
Fine-aggregate grouts blur the boundary without erasing it. MAPEI’s Ultracolor Plus FA is a polymer-modified cement grout its maker rates from 1/16 inch to 3/4 inch; a 25 pound bag in a color such as 5107 Iron listed at $29.97 at Floor & Decor in 2026.
Where Epoxy Grout Earns Its Price
Epoxy grout is a different family, governed by ANSI A118.3. It holds no portland cement, does not absorb water the way cement does, and never needs sealing.
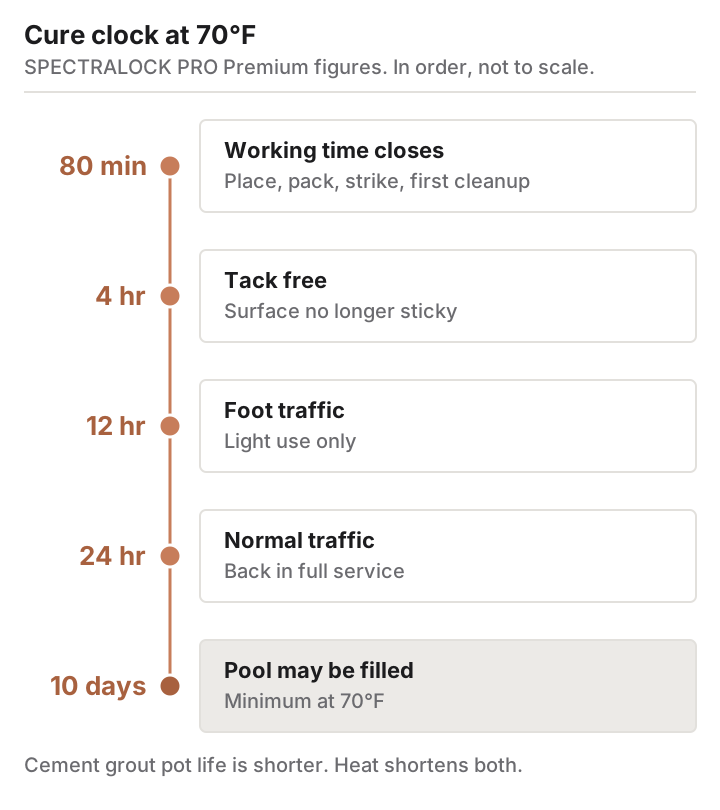
LATICRETE SPECTRALOCK PRO Premium Grout is the product most people meet first, and its published figures set the pace of the job: joints from 1/16 to 1/2 inch, roughly 80 minutes of working time at 70°F, tack-free in about four hours, foot traffic at 12 hours and normal traffic at 24. Pools wait at least 10 days at 70°F. At Floor & Decor in 2026 the Part A+B unit lists at $101 and covers up to 162 square feet; the matching Part C color powder adds about $20 per 9 pound carton.
Run the arithmetic on a real enclosure: a 3 by 5 foot shower tiled to 8 feet has 88 square feet of wall, (3 + 5 + 3) x 8, plus 15 square feet of floor, or 103 square feet total. The cement route costs one or two 25 pound bags at about $30 each plus a quart of penetrating sealer at $25 to $35, so $55 to $95 in year one. The epoxy route is one full unit at roughly $121 and no sealer, ever. That gap of $26 to $66 closes after two resealing cycles.
Epoxy earns its premium on shower floors, behind a range, and anywhere food acids land. On a guest bathroom wall wiped twice a year, it solves a problem you do not have.
What Sits Behind the Grout Is Not a Grout Job
No grout family makes a wet assembly watertight. Grout is a joint filler, not a waterproofing layer. What keeps water out of a shower is the pan, the membrane and the flashing behind the tile, all installed before a single joint is filled.
Filling and refilling joints is ordinary homeowner work. The layers underneath are not. A shower pan and its membrane, any alteration to supply or drain lines, and anything built as a pool or a steam room are inspected assemblies, closed up only after someone signs off on them, and the trades that build them are a licensed plumber and a licensed tile contractor working to the code edition your jurisdiction adopted. If cutting out a failed joint exposes soft substrate, standing water or a crumbling pan, stop and call one.
Single-Component Grouts and the A118.19 Middle Ground
Between cement and epoxy sits a category that arrives premixed in a pail with a urethane or acrylic binder. The industry gave these their own specification in 2023: ANSI A118.19, Organic Pre-mixed Grouts. Because the binder is a polymer, the standard tests indentation resistance instead of compressive strength.
Custom Building Products’ Fusion Pro Single Component Grout, sold in gallon and quart pails and rated for 1/16 to 1/2 inch joints, runs roughly $55 to $68 a gallon depending on color. The category’s limit is moisture during cure: trade coverage of pre-mixed grout notes that low temperatures or excess moisture after installation inhibit the polymer reaction and drying, and that these products are not for continuously submerged installations or steam rooms. Read that as slower in a sealed humid bathroom.
| Grout family | ANSI spec | Joint range | Sealing | Best use |
|---|---|---|---|---|
| Standard cement | A118.6 | 1/16 to 3/8 in | Yes | Dry floors |
| High-performance cement | A118.7 | 1/16 to 3/4 in | Varies | Most work |
| Organic pre-mixed | A118.19 | 1/16 to 1/2 in | No | Backsplashes |
| Epoxy | A118.3 | 1/16 to 1/2 in | No | Showers, kitchens |
Those are each maker’s published figures; read the bag, not the family.
Grout Color Redraws the Pattern the Tile Cannot
A contrasting joint turns a layout into a drawn grid: every offset becomes legible, and a plain 3 by 6 inch subway field reads as deliberate geometry. Contrast is also a commitment to your installer’s accuracy, because charcoal against white publishes a 1/16 inch lippage error that mid-gray would absorb. Cement grout dries lighter than it looks wet, so judge a sample packed at the real joint width, dry.
Efflorescence and Shading Both Trace Back to Water
Efflorescence is a mineral deposit: soluble salts dissolve inside the assembly, migrate through the joint, and bloom as water evaporates. The source is usually moisture moving up through a slab, and it returns until that path is closed.
Shading is more often self-inflicted. TCNA notes that grout mixed with too much water, cleaned too soon, or cleaned with excess water can drive the polymer to the surface, and that those polymers are frequently white, so blotchy color is binder sitting on top instead of inside. Prevention is the same either way: exact mix water, full wait before the first cleanup, minimal water when you do.
Nine Steps for Placing Grout That Sets Correctly
- Confirm the setting mortar has cured to its manufacturer’s schedule. Grout over green mortar traps water with nowhere to go.
- Clear the joints. Pull every spacer, scrape out mortar ridges standing proud, and vacuum.
- Mix to the published water ratio in a measured container. This causes more shading complaints than any other step.
- Slake for the interval on the bag, then remix briefly without adding water.
- Work an area you can finish inside the product’s working time. SPECTRALOCK PRO Premium gives about 80 minutes at 70°F; cement pot life is shorter, and heat shortens both.
- Pack the joint by driving the float diagonally, never parallel, covering each area from two directions so the grout compacts to full depth.
- Strike the excess with the float held on edge, again diagonally.
- Start the first cleanup pass when the manufacturer specifies, which for SPECTRALOCK falls inside that same 80 minute window. Barely damp sponge, frequent water changes, no chasing streaks.
- Protect the surface through cure: tack-free at four hours, foot traffic at 12, normal traffic at 24, and 10 days at 70°F before a pool is filled.
ANSI A108.10 requires in section 5.3.4 that all grout joints be uniformly finished, with cushion-edge tile finished evenly to the depth of the cushion. A low joint is not cosmetic; it is less material resisting the same abrasion.
Sealing Cement Grout and the Water-Drop Check
Cement grout is porous, and TCNA states that a sealer is a very good idea for cementitious grout, distinguishing penetrating sealers, more durable and more expensive, from topical sealers that wear away. Penetrating products such as Custom’s Aqua Mix Sealer’s Choice Gold leave no film; the rapid-cure version claims protection in under four hours.
Test rather than guess at intervals. Put three or four drops of water on the joint in the hardest-used spot, wait two minutes, and look. Beading means the sealer is intact; soaking in or darkening means reapply.
Cleaning Without Eroding the Joint
Cement is alkaline and dissolves in acid, which is why a vinegar routine slowly ruins a grout line. TCNA compares the reaction to baking soda and vinegar, recommends an alkaline cleaner over an acid-based one, and notes that needing to regrout is sometimes the result. A stiff wire brush also lifts a thin layer of joint along with the soil, which over years is measurable loss of depth. Use nylon bristles, and lift the dirty water off rather than pushing it around.
Cutting Out and Refilling a Failed Joint
- Diagnose before cutting. A crack running the full length of an inside corner or change of plane is a movement problem, not a grout problem. ANSI A108.01 and TCNA method EJ171 put a flexible ASTM C920 sealant in those joints, not rigid grout, so refilling with grout guarantees the crack returns.
- Remove old grout with a carbide grout saw or an oscillating tool fitted with a carbide blade, tracking the joint center in several shallow passes.
- Go deep enough that the refill has structure. On a 3/8 inch thick tile whose joint is 1/8 inch, clearing the full tile depth gives new grout three times as deep as it is wide.
- Vacuum the channel, wipe with a barely damp sponge, and let it dry. Dust becomes a bond breaker.
- Refill with the same family and color as the surrounding grout. A cement patch in an epoxy field will read as a different material within a year.
- Hold the same cure and cleanup timings as a full installation. A four foot repair runs the same clock as a whole floor.
The Maintenance Calendar Each Grout Hands You
The cheaper grout is not cheaper. It is financed. Cement grouts carry a recurring obligation: the water-drop test at least annually, and resealing whenever the drops stop beading, which in a daily-use shower can mean every year. Epoxy and organic pre-mixed grouts carry none.
Price that difference across the life of the tile, not the week of the install. The shower calculated above, grouted in cement, wants a $30 quart of sealer and an hour of labor every year or two, indefinitely. The epoxy that cost $26 to $66 more on day one has asked for nothing since. Over ten years the arithmetic stops being close, and the joint, always the first to fail, is the part still holding.