Closet Rod Heights and the Math of Double Hanging
Pick up a tape measure and a hanger before you measure a single wall. Every rod height in a closet plan comes from one number per garment type: how far that garment drops below the rod it hangs from. The walls are constraints you check against afterward, not the inputs you design from.
Reverse that order and you build to a convention rather than to a wardrobe: a rod at whatever height the last owner used, and folded trousers with fourteen inches of empty air above the hems. That dead band is a sequencing failure, not a shortage of space.
Hook to Hem, the Measurement Everything Else Follows
Measure hook to hem, not shoulder to hem. Hang the garment on the hanger you actually use, hold the top of the hook, and run the tape straight down to the lowest point of the fabric. The hook is what rests on the rod, so that drop starts at the rod line itself. Any other starting point buys an inch or two of error that resurfaces as a sleeve brushing a shoe shelf.
Work from the longest example in each category, never a typical one; planning to the average leaves the outliers dragging. The bands below are orientation only, so replace each with a figure off your own tape before you drill.
| Garment on its hanger | Hook to hem (in) | Linear in. each |
|---|---|---|
| Trousers folded over the bar | 20 to 24 | 1.5 |
| Folded skirts | 24 to 32 | 1.5 |
| Shirts and blouses | 30 to 38 | 1 to 1.5 |
| Blazers and suit jackets | 36 to 42 | 2 to 2.5 |
| Trousers clipped at the waist | 42 to 48 | 1.5 |
| Day dresses | 45 to 55 | 1.5 to 2 |
| Long coats | 50 to 62 | 3 to 4 |
| Gowns and full-length robes | 60 to 70 | 3 |
Adding the Double-Hang Stack Up from the Floor
Double hanging is an addition problem worked upward from the floor, with three clearances buried in it. Take a lower rod holding folded trousers whose longest hook-to-hem is 24 inches, and an upper rod holding shirts and blazers whose longest is 38 inches.
Allow 3 inches of floor clearance under the lowest hem, add the 24-inch trousers, and the lower rod lands at 27 inches. The upper garments have to clear that rod, so allow 3 more and put the upper hems at 30 inches. Add the 38-inch shirts and the upper rod sits at 68 inches. Leave 2 inches between rod and shelf underside so a hanger hook lifts clear, and the stack finishes at 70 inches.
Seventy inches is under six feet. Beneath a 96-inch ceiling that leaves more than two feet unused, which is what most closet plans miss: the ceiling is rarely the binding constraint.
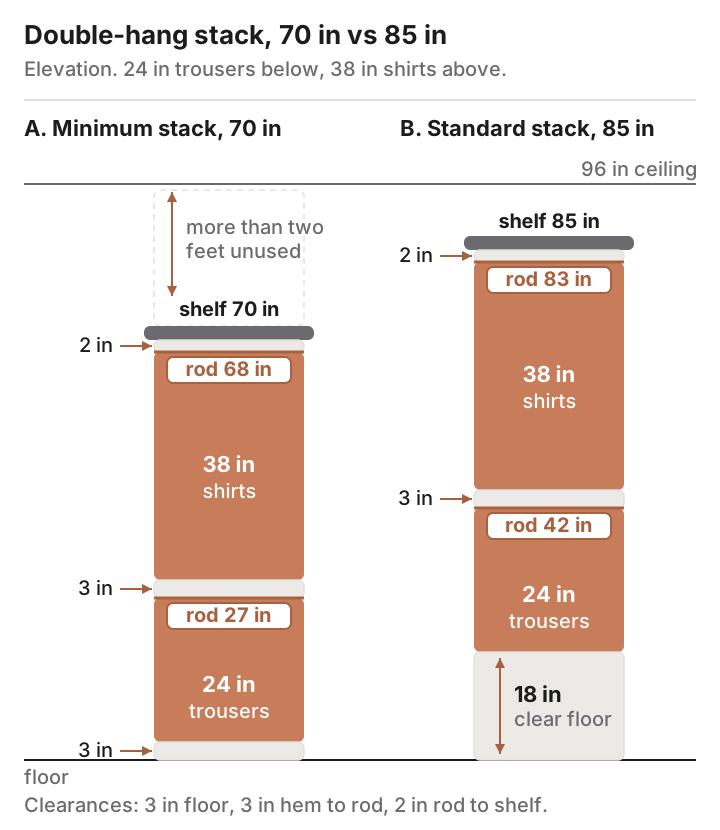
Few people want the lower rod at 27 inches, since the floor beneath it earns more as drawers than as trouser hems. Push that rod to 42 inches and the arithmetic follows. Hems land at 18 inches, leaving 18 inches of clear floor for a drawer bank or a two-tier shoe rack; upper hems move to 45, the upper rod to 83, the shelf underside to 85. That is the layout most kits are cut for.
Ceiling Height and the Rod You Can Reach Without a Stool
Height is a reach problem long before it is a ceiling problem. A rod at 68 inches is within easy reach for nearly any adult; at 83 inches it is a stretch for many, and a step stool is a tax you pay every morning for storage you gained once.
One published benchmark is worth knowing, though it does not govern a bedroom closet. The 2010 ADA Standards for Accessible Design require storage elements to meet one of the reach ranges in section 308, and the unobstructed range runs 15 inches minimum to 48 inches maximum above the finish floor. The text says storage elements rather than clothes rods, and it binds public accommodations rather than a private bedroom; whatever your own jurisdiction has adopted still sits above it on any real project. Borrow the 48-inch ceiling anyway if someone in the household uses a wheelchair.
A licensed electrician does closet wiring: relocating the existing fixture, or running an outlet to feed a lit rod. Beyond the labor there is a rule peculiar to closets, since the adopted code limits which luminaire types may hang in a space full of clothing and sets a minimum separation between the fixture and stored material. Most places want a permit and a final inspection on that work, and your building department is where those clearance figures come from.
Single Rod and Shelf, Measured Down from the Shelf
A single rod is set by its shelf, not by the clothes, because the shelf is what your hands reach over. Fix it first at a height you can load without climbing, then hang the rod 2 inches below its underside. Run the check in reverse: shelf underside, minus 2, minus your longest hook-to-hem, should still leave 3 inches of clear floor.
Put the shelf underside at 68 inches and the rod lands at 66. A 52-inch coat leaves 14 inches of floor, a shoe row. Gowns at 62 inches leave 4 inches, tight but workable. Nothing 70 inches long fits; a robe that size needs its own bay with the shelf raised or left out.
Shelf Depth for Folded Stacks and for Shoes
Folded clothes and shoes want different depths. Fold your bulkiest sweater as you fold it, measure the block front to back, and add an inch. Most folded stacks settle near 12 inches, and a stack that overhangs its shelf slumps forward within a week.
Shoes get measured heel to toe, longest pair first. Past 12 inches, a 12-inch shelf will not hold a shoe flat, so it overhangs the edge or turns sideways and eats double the width. Tilting the shelf reduces the depth each pair occupies, at the cost of vertical space.
Shelving comes in stock depths, so your measured number selects a depth rather than producing one. Round up: an inch too deep costs nothing, an inch too shallow is permanent.
Rod Setback from the Back Wall and the Gap in Front
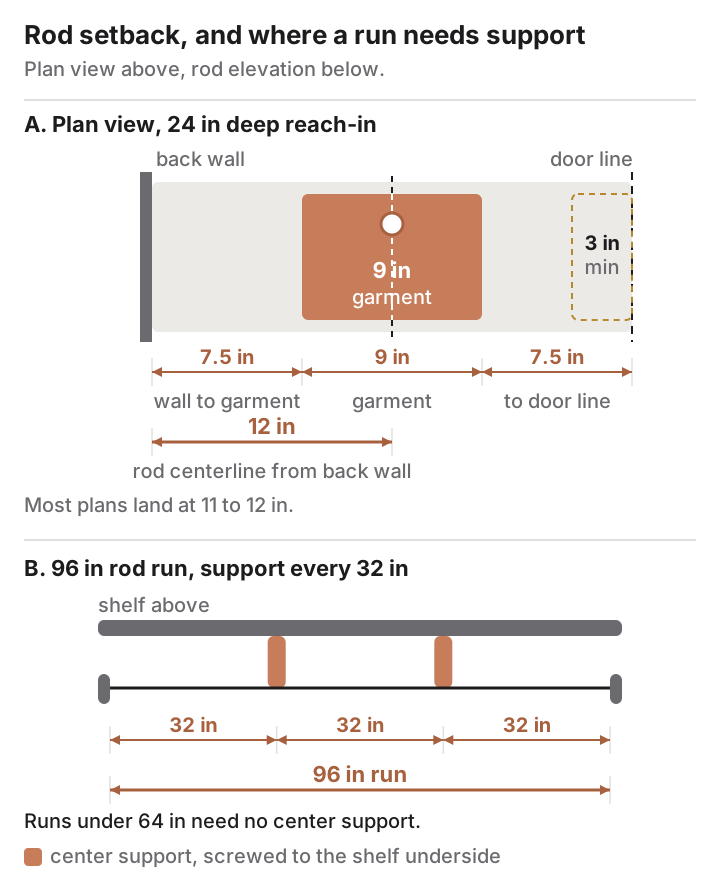
Distance from the back wall is set by the bulkiest garment measured front to back on its hanger. Hang the parka against the wall and measure how far it stands off. The garment hangs centered on the rod, so the centerline wants half that depth plus an inch of knuckle room behind it. Most plans land at 11 to 12 inches, which is why a 24-inch-deep reach-in works.
Front clearance is the other half. In a 24-inch closet with the rod centerline at 12 inches, a garment 9 inches deep front to back fills the zone from 7.5 to 16.5 inches out from the back wall, leaving 7.5 inches to the door line. Hold at least 3 inches of that as open air, because bifold hardware and door tracks take a bite.
Counting Linear Inches Before You Count Rods
Linear inches are the capacity unit of a closet: every rod run has a finite length and every garment eats a slice. Push ten shirts together on the hangers you own, measure the block edge to edge, divide by ten, then repeat for jackets and coats.
Say the count comes to 30 shirts at 1.25 inches, 18 folded trousers at 1.5, six blazers at 2.5, and four winter coats at 3.5. That is 37.5 plus 27 plus 15 plus 14, or 93.5 linear inches. A 48-inch double-hang bay supplies 96. The wardrobe fits with nothing spare, worth knowing before the hardware goes up.
Rod Diameter, Steel Wall, and When a Run Needs a Center Support
Closet rod is not one product. Knape & Vogt’s 0021 adjustable closet rod is 22 gauge steel at 1-1/4 inches, sold in four telescoping ranges from 18 to 30 inches up to 72 to 120 inches, and the maker calls it regular duty. The 0015 heavy-duty cut-to-fit pole measures 1-5/16 inches with what the company describes as a double-thick 17 gauge wall, in 72-inch and 96-inch lengths. Gauge numbers run backwards, so 17 is the thicker wall.
Heavier still is the 770 extra-duty closet rod, at 1-1/16 or 1-5/16 inches outside diameter with a 0.106-inch steel wall. Diameter and wall thickness both help. Span helps more, and span is the variable you control on paper.
The planning threshold comes from the manufacturer’s instruction for its center support bracket: one support every 32 inches on any run of 64 inches or longer. Below 64 inches, a rod on two end flanges carries a normal load. Past it a loaded rod bows, and in thin-walled tube that bow does not come back out.
A catch worth planning around: a center support hangs from the shelf directly above, so a rod with open air over it cannot take one. If the design calls for a long run with nothing overhead, break it with a vertical divider or step up to a thicker wall. Panel kits such as ClosetMaid’s SuiteSymphony and SpaceCreations are built from tower units and rod dividers, which break the runs for you.
A Seven-Step Sequence for Measuring and Laying Out the Closet
- Sort everything you plan to hang into six or seven categories, then pull the longest example from each.
- Measure those garments hook to hem on the hangers you use, and write each number beside its category.
- Count the garments per category and multiply by the spacing from your own ten-hanger block.
- Measure the closet: inside width wall to wall, inside depth, and floor to ceiling at both ends.
- Build the stack on paper from the floor up, using 3 inches of floor clearance, 3 inches between an upper hem and the rod below, and 2 inches between any rod and the shelf above.
- Compare the stack total to the wall height and the linear-inch total to the rod runs you drew, then adjust the drawing rather than the wardrobe.
- Mark every rod and shelf height on the wall in pencil, work the door open and shut, and reach for each mark before buying.
Finding the Dead Air in a Closet You Already Have
- Measure from the lowest hem on each rod to the floor. Anything over 12 inches under a short-garment rod is recoverable.
- Measure from the top shelf to the ceiling. That band is usually the largest single loss in the room.
- Check each rod-to-shelf gap. More than 3 inches there is doing nothing.
- Look for one rod running the full width carrying only shirts, the classic candidate for splitting into two bays.
- Add the recoverable bands together. Past roughly 30 inches, a re-layout gains more room than any accessory.
The Addition Problem That Settles Double Hanging
One sum decides it. Take the longest hook-to-hem going on the lower rod, add the longest going on the upper rod, add 8 inches for the three clearances, and compare the total to the clear wall height under your top shelf. Shirts over folded trousers came to 62 plus 8, or 70 inches, which almost every closet clears.
A second figure decides whether you enjoy using it. Subtract 2 inches from the stack total for the upper rod height. Land near 68 inches and the closet works without a stool. Push it to 83 and you have bought double hanging and a step stool together, a trade better made on paper than on a ladder.